Event-Driven Patterns for the Internet of Things


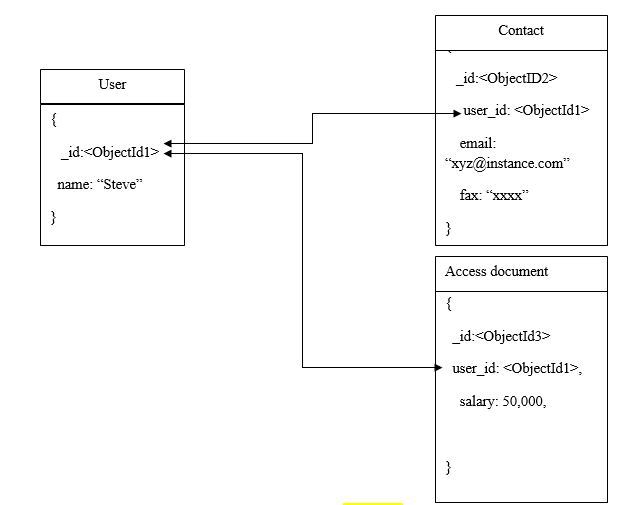
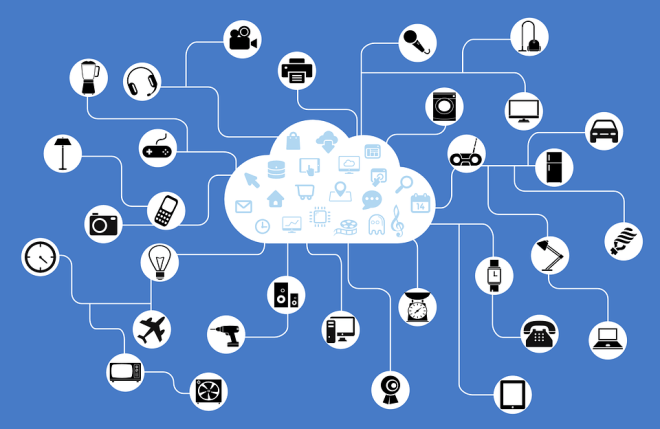
Due to the IoT devices and sensors being everywhere and gathering voluminous amounts of data, one of the most challenging issues is to assess the continuously growing data sets, particularly in real-time. For IoT systems, it is necessary to be capable enough to respond timely with the ever-changing trends so you can deliver real-time BI (business intelligence) that can have a major role in the IoT solutions’ success. If you are using an event-driven architecture for your internet of things ecosystem then the following patterns can hugely benefit you.

Complex Event Processing

Complex event processing tackles the issue of repeated incoming pattern events. Generally, the matching culminates into complicated events that are itself created from the input events.

In conventional DBMS, typically a query is run on stored data; on the other hand, complex event processing runs data on a stored query.

You can eliminate any irrelevant query data. CEP is useful as they are applicable to infinite data streams. Moreover, the processing of input data is quick. When the IoT ecosystem checks all the matching sequence events, results are released. As a result, it helps with the analytics capabilities of the complex event processing.

Put simply, event processing is used for the identification of events (like threats or opportunities) and generates a response for them prior to its occurrence or in its aftermath. Bear in mind that event-driven architecture and complex event processing are closely interlinked.

Event Processing

For creating IoT-scalable applications, one of the more popular distributed architecture patterns is the event-driven architecture. The pattern comprises of single-purpose and highly decoupled components of event processing which process and receives events with an asynchronous format.

One specific area where an event-driven architecture can come in handy is those complex engineered system with a loosely coupled structure. There is no need to specify a formal or bounded infrastructure to categorize components. Instead, you can introduce autonomy for the components that are open to both decoupling and coupling with various networks while responding to a wide range of events. Hence, it is possible to reuse IoT components with separate networks.

Mediator and broker are the two primary topologies of the event-driven architectures.  The mediator topology is often required when you have to orchestrate several steps with a central mediator for an event. On the other, broker topology can be useful when you do not want to work with a central mediator for chaining events together.

Mediator Topology

Events that have a wide range of steps and need to process the event with orchestration can use the mediator topology.

The mediator topology offers event processors, event channels, event mediator, and event queues. The flow of the events begins when an event queue receives an event from a client, which is usually required for the event’s transportation to the event mediator. After getting the initial event, the event mediator performs the orchestration of the event; to do this, it sends more asynchronous events towards the event channels for executing all the process steps. The event channels are listened by the event processors who are given the event by the event mediator. Afterward, certain business logic is executed for processing the event.

Broker Topology

The broker topology is not the same as the mediator topology because of the lack of a central event mediator. Instead, a message broker is used to distribute the message flow between the components of an event processor with a chain-like approach. This topology is primarily used when there is no central event orchestration and the event processing flow is relatively straight-forward and simple.

Broker topology is composed of two components: an event processor and broker component. The broker component can be federated and centralized; all the event flow’s channels are stored by the broker. These channels can be message topics, message queues, or both.

Event Sourcing

The pattern is used to specify the methodology for managing data operations which are driven by a sequence of events—an append-only store saves all of them. An event-based series is sent by the application code which contains details of all the actions that have been performed on the event store’s data.

The concept around event sourcing revolves around the idea that when a system’s state is modified, the change of state can be referred to as an event. This means that the system can be reconstructed in the future if the events are reprocessed. The primary truth source is the event store where the system state entirely depends on it. A version-control system is one of the examples of this idea.

Events are raised by the event source and operations are performed by tasks in reply to those events. This tasks’ decoupling allows for achieving greater extensibility and flexibility. The event data or type of event, such details are known by the task, although they are unaware of the actual operation that invoked the event. Furthermore, every event can be managed by several tasks. This helps with integrating other systems and services that look for any latest event from the event store.

The events of event sourcing are typically on a low level; it is possible that you might need to create specific integration events.

An append-only operation is used to store events; they are asynchronous and immutable. In the background, tasks run to manage the events. Additionally, if the transactions’ processing suffers from lack of contention then scalability and performance can be significantly improved for IoT applications, particularly while working with the user interface and presentation level.

However, there are certain issues with the event source as well. For instance, there are no existing solutions or standard strategies like SQL queries to read the events for procuring information. To assess the current entity’s state, all events can be replayed which link with it against the original entity’s state. The process of replaying events has its own pitfalls, such as the outside systems’ interactions on which the results rely.

Advertisement

Memory-Centric Architectures


Businesses of both small and large scale develop mobile apps, web applications, and IoT projects to power their IT infrastructures. At times, for getting high scalability and speed to support mission-critical systems, they make use of IMC: in-memory computing. As a result, it comes off as no surprise that in-memory computing platforms are trending. Moreover, IMC technology is evolved with the memory-centric architecture, providing a greater degree of ROI and flexibility against different data sets.

Background

Back in the second half of the 20th century, restrictions regarding disk-based platforms soon came into notice. It was found out that with transactional databases, data analysis and processing was prone to affect DB performance. Consequently, there was a need for disparate analytical DBs.

In this decade, businesses quickened businesses processes to kick off a wide range of initiatives related to digital transformation, resolve requirements pertaining to real-time regulations, and deploy omnichannel marketing strategies. However, real-time data analysis and action is not possible because of the ETL processes. Therefore, in-memory computing solutions which use HTAP (hybrid transactional/analytical processing) are used for real-time data analysis and processing against the given data.

In the past, RAM was costly and servers were considerably slow. The capability of caching and quickly processing data which resided in RAM for removing latency was quite restricted. Strategies of distributed computing like when in-memory data grids were deployed against commodity servers, allowed scaling between the available CPU and RAM—still, RAM remained quite expensive.

However, with the passage of time, the RAM costs have decreased. Additionally, APIs and 64-bit processors have enabled the in-memory data grids to assist integration with data layers and existing applications, offering high availability, scalability, and in-memory speeds.

At one hand, in-memory DBs came into production so they can become a replacement for the previous disk-based DBs. Despite the progressive nature of these steps, they unintentionally added fragmentation and complexity in the in-memory computing market.

Recently, in-memory DBs, in-memory data grids, machine learning, streaming analytics, ANSI-99 SQL, and ACID transactions—all of them have integrated with the emergence of IMC solutions into a single, reliable platform. These platforms offer greater convenience for use and deployment over those point solutions that seemed to provide as\ single product capability. As a result, these in-memory computing platforms were influential in significantly cutting down the operation and implementation expenses. Furthermore, there has been a dramatic shift in scaling out and speeding up the previous applications by designing these modern applications with the help of memory-centric architectures in a wide range of industries like healthcare, retail, SaaS, software, internet of things etc.

How In-Memory Computing Solved Real-World Issues

The biggest Russian bank—Sberbank—struggled with digital transformation in the past. What the bank wanted was to ensure support for mobile and online banking, work around with 1.5 petabytes of data for real-time data storage, and assist its 135 million customer base by facilitating a large number of transactions for each passing second. At the same time, the bank desired support for ACID transactions to monitor and track transactions and singled out high availability as one of the requirements. By using in-memory computing, the bank designed a modern web-scale infrastructure, consisting of 2,000 nodes. Experts reckon that in-memory computing has made sure that their infrastructure can compete with the best supercomputers in the world.

Similarly, Workday holds a reputation as one of the most famous enterprise cloud solutions in the HR and finance market. The brand serves close to 2,000 customers—a significant portion of whom belong to the Fortune 500 and Fortune 50. Around 10,000 employees run the company. In order to offer SaaS-based solutions, Workday utilizes IMC platforms for processing more than 185 million transactions daily.

Memory-Centric Architectures

Among the restrictions of in-memory computing solutions, a crucial one dictates that all the available data has to somehow “fit” in the memory. However, doing this is more expensive as opposed to storing the majority of the data in the hard disk; therefore, usually, businesses opt against maintaining all of their data in the disk. On the other hand, memory-centric architectures completely eliminated this issue. What they do is that they offer the means to utilize other storage and memory mediums like 3D XPoint, Flash memory, SSDs, and other storage technologies. The idea behind memory-centric architectures is simply “memory-first”. This means that the recent and important data is located in memory and disk simultaneously so the required in-memory speed can be attained. However, what separates this architecture from the rest is that the RAM amount can be exceeded by the data set. As a result, it is possible that the complete dataset resides on the disk while it offers robust performance by processing on the underlying disk store or processing against data in memory.

Keep in mind that this is different from disk-based data caching in memory. Companies leverage the capability for surpassing the memory amount; it helps them to optimize data in such a way that the entire data can reside on the disk, where the more important and valued data is located in-memory. Similarly, the less critical data is stored on the disk. Thus, memory-centric architectures have allowed companies to improve performance and reduce infrastructure expenses.

Essentially, a memory-centric architecture removes the requirement for all the waiting that is done so the RAM gets the reloaded data after a reboot scenario. Often, these delays consume a great deal of time based on the network speed and database size, violating SLAs in the process. When the system is able to perform computations on data directly from the disk while the system is still warming up and reloading the memory, you can ensure quick recovery. At first, you might find the performance identical to the disk-based systems; however, it is going to quickly improve in speed when the data is reloaded into memory, making the processing of all the operations compute with in-memory speeds.


Automation Anti-Patterns That You Must Avoid


Regardless of your testing experience or the effectiveness of your automation infrastructure, you should use a robust test design to initiate automation. The lack of strong test design can force testing teams to face a wide range of issues which generate incomplete, inefficient, and difficult-to-maintain tests. In order to make sure the cost efficiency, quality, and delivery are not affected, it is necessary to familiarize with those indicators which represent the performance of tests. To begin with, consider the following automation anti-patterns to improve testing.

Longer Length of Sequence

Often, tests are created with small steps for long sequences, thus their management and maintenance is hard. For instance, while an application which is currently being tested undergoes changes, it is considerably complex to work around these modifications with other tests.

Instead of using a bottom-up approach first, generate a high-level design. In accordance with the respective method, such a design can consist of features like scopes and definitions of test products which are included in the main objective and test objective for different tests. For instance, a product could consist of test cases which test the calculation process of home loan mortgage premiums.

Business-Tests

When testers focus too much on interaction tests, it is possible that they may design weak tests which do not factor major business-level concerns like the interaction of application responses for unusual circumstances.

Testers should emphasize on the use of businesses tests which represent rules, objects, and processes of business alongside the interaction tests. For instance, with a business test, a user can log in, type a few orders, and view the financial information with the help of high-level activities which mask the details of the interaction.

In interaction tests, a user can type name/password combination and assess whether or not the button of submission (submit) is enabled or not—such a test can occur in any business environment type.

Blurred Lines

While it is important to run interaction and business tests, however, keep in mind that they should be run separately. For instance, the rules and lifecycles of business objects along with their processes and calculations must not be combined with interaction test details like confirming the presence of submit button or determining whether or not a login message is displayed after the login process. Such a scenario can make maintenance hard due to the mix. For instance, if the welcome message is generated in a new application version, all the associated tests have to be checked and maintained.

A modular and high-quality test can help testers with the correct vision about how these blurred lines should be avoided to make sure the maintainability and manageability is strong. Test modules are known to carry a well-defined scope with test modules. They prevent checks which are not suitable for their scope and mask comprehensive steps for the UI interactions.

Life Cycle Tests

Most of the global applications work with business objects like products, invoices, orders, and customers. The application lifecycles of such objects are updated, retrieve, create, and delete—known as CRUD. The major issue is that the tests for these lifecycles are hard to find, incomplete, and scattered. Hence, there can be real vulnerabilities in the tests’ scope especially in the case of business objects, particularly when the business objects are ever-changing. For a car rental, while one can try several vans and cars, however, the coverage is lesser for both the buses and motorcycles.

It is easy to design life cycle tests. You can initiate by choosing business objects along with their operations. Such a process can also consist of variations like updating or canceling an order. It is important to remember that life cycle tests are similar to business tests, instead of the interaction tests.

Poorly Developed Tests

Factors like pressure, time, and others can culminate in the creation of shallow test cases which are not good enough to properly test the application. As a result, quality suffers, like missed situations which are not responded. Doing this can also affect the test maintenance, making it more expensive.

More importantly, it is necessary to sync both the testing and test automation for the entire Scrum sprint. These tests and their automation require a greater degree of cooperation which is tougher in case they are still running after the completion of the sprint.

When improved automation architecture and test design are not good enough in keeping up with the velocity, then you can think about the outsourcing of a number of tasks so the testers are able to match the speed.

You have to think in terms of a professional tester—as an individual who has a knack of breaking things. For instance, if different testing methods like error guessing decision tables are used then they can assist to pinpoint those situations which require immediate assistance with the test cases. On a similar note, equivalence partitioning and state-transition diagrams can help to think about different design to test the cases.

Scope

Lack of scope in tests is quite a common problem like when an entry dialog has to be tested by a test or with a group of financial transactions. It is easy to find the tests and also update in case of changes in the application while duplication is also possible.

Duplicate Checks

Testers usually use to assess steps by using an unexpected output for all the steps; this is also encouraged by different management tools. What this indicates is that separate tests can be used for the same check. For instance, the previous test determined whether or not the welcome screen is generated after the login.

Begin with a test design on which the testers focused heavily. You have to ensure that all the modules in the test have well-differentiated and clear scopes. Hence, during the development of such tests, you have to avoid checking after each step. Add checks according to the scope.

AWS S3 Tips for Performance


Amazon S3 is used by many companies for storage purposes. Due to its use as object storage, it offers flexibility with a slew of data types including small objects to massive datasets. Thus, S3 has carved out its niche as a great service which can store a broad scope of data types via a resilient and available environment. As your objects of S3 have to be accessed and read by other AWS services, applications, and end users, do you believe that they are optimized to offer the best possible performance? Here is how you can optimize your S3. Follow these tips to improve your performance with Amazon S3.

Perform TCP Window Scaling

TCP window scaling facilitates developers to improve the network throughput performance via the modification of the header in the TCP packet that uses a window scale. This helps in sending data with a single segment—more than the traditional 64 KB. It is important to note that such practice is exclusive to S3; it functions along with the protocol level. As a result, by using this protocol you can execute window scaling for your client while establishing a connection with a server.

When a connection is established between a destination and source by the TCP, then the next thing is a 3-way handshake that starts up from the source. This means that with the S3 view, it is possible that the client might be required to upload an object to the S3. However, prior to this, you must create a connection with the S3 servers.

A TCP packet will be sent by the client along with a defined window scale of TCP in the header—such a request is also referred to as SYN request—the first part of the 3-way handshake. When the S3 gets this request, it uses an SYN/ACK message to send a response to the client while using the same window scale factor—this forms the second part of the 3-way handshake—maintaining the relevant window scale factor. The third and final part consists of an ACK message which is sent to the S3 server—it serves as the response’s acknowledgment. A connection is generated after this 3-way handshake ends where the S3 and client can finally exchange data.

In order to send more data, you can widen the window size via a scale factor. This helps in sending voluminous amount s of data via a single segment whereas your speed is also quickened.

Use Selective Acknowledgment

At times while using TCP, it is not uncommon for packets to get lost. To figure out which of the packets went missing is hard within a TCP window. Consequently, at times it is possible to resend all of these packets. However, then the receiver may have received some of the packets so this is an ineffective strategy.

Instead, you can use TCP SACK (selective acknowledgment) for improving performance where the sender receives notifications about which were the failed packets for a window. As a result, the sender can then easily only resend the failed packets.

However, it is necessary that the source client or the sender initiates the SACK when a connection is being established amidst the handshake’s SYN phase. Such an option is also called as SACK-permitted. For using and implementing SACK, you can visit this link.

Setting Up S3 Request Rates

Alongside TCP SACK and TCP Scaling, S3 is quite nicely optimized to address a high request throughput. A year back, in 2018, AWS introduced a new change for these request rates. Before the announcement, it was recommended that the prefixes can be randomized within the bucket to help with performance optimization—there is no more need for it. Now exponential growth of request rate performance can be achieved when more than one prefixes within the bucket are used.

Now, developers are getting a 3,500 PUT/POST/DELETE request for each second while they are also achieving 5,500 GET requests. A single prefix is a reason behind such limitations. However, keep in mind that there is no limit for prefixes which are to be used in an S3 bucket. What this means is that if you use 2 prefixes then you can get 110,000 GET requests and 70,000 PUT/POST/DELETE for each passing second for the same bucket.

There is no hierarchical-based structure in the folders of S3; it follows a flat structure for storage. This means that all you need is a bucket while all the objects are saved in a flat space of the bucket. You can generate folders and store objects in it—without depending on a hierarchical system. The prefixes of the object are responsible to make them unique. For instance, in case you have the following objects in a bucket:

  • Design/Meeting.ppt
  • Objective/Plan.pdf
  • jpg

Here, the ‘Design’ folder serves as a prefix for identifying the object—such a pathname is also referred to as the object key. The ‘Objective’ folder is also an object’s prefix while the ‘Will.jpg’ is without any prefix.

Amazon Cloud Front

One more strategy for optimization is to integrate Amazon CloudFront with Amazon S3. This is a wise strategy when the request of the S3 data is a GET request. CloudFront is a content delivery network which increases the pace of the distribution of dynamic and static content across a global network comprising of edge locations.

Typically, after a user sends a request from S3 in the form of GET request then the S3 service is used to route it while the relevant servers return the content. In case you use CloudFront with S3 then it can also perform caching for those objects which are requested commonly. Hence, the user’s GET request is directed to the nearest edge location that offers low latency for returning the cached object and providing the best performance. It also decreases the AWS costs when the number of GET requests in the buckets is shortened.


Best Code Review Practices


How do you run code reviews? Code reviews are vital and enhance the quality of code. They are responsible for the stability and reliability of the code. Moreover, they build and foster relationship among team members. Following are some of the tips for code reviews.

1.   Have a Basic Understanding of What to Search in the Code

To begin with, you should have a basic idea about what you are looking for. Ideally, you should look for major aspects like the following.

  • What structure has the programmer followed?
  • How is the logic building so far?
  • What style has been used?
  • How is the code performing?
  • How are the test results?
  • How readable is the code?
  • Does it look maintainable?
  • Is it ticking up all the boxes for the functionality?

You can also perform static analysis or other automated checks to evaluate the logic and structure of your code. However, some things are best reviewed from a pure manual check like functionality and design.

Moreover, you also have to consider the following questions for the code.

  • Are you able to understand how the code works and what does it do?
  • Is the code following the client requirement?
  • Are all modules and functions running as expected?

2.   Take 60-90 Minutes for a Review

You should avoid spending too much time for reviewing a codebase in a single sitting. This is because after a 60-minute time interval, a code reviewer naturally begins sensing tiredness and does not have the same physical and mental strength to pick out defects from the code. Such state is supported by proofs from other studies as well. It is a common fact that whenever human beings commit themselves to an activity which needs special attention, their performance begins to experience a dip after 60 minutes. By following this time period, a reviewer can at best review around 300 to 600 lines of code.

3.   Assess 400 Lines of Code at Max

According to a code review by Cisco, for best results, developers should conduct a code review which extends from 200 to 400 LOC (lines of code) at a time. After this time period, the capability to identify bugs begins to wither way. Considering an average review stretches up to 1.5 hours, you can get a yield in between 70-90%. This means that if there were 10 faults in the code, then you maybe successful to find at least 9 of them.

4.   Make Sure Authors Annotate Source Code

It is possible that authors of the code can remove almost all of the flaws from the code before a review is required. This can be done if it is mandatory for the developers to re-check their code, thus making reviews end faster while the code quality remains unaffected as well.

Before the review, authors can use annotation in their code. With annotations the reviewer can them go through all the modifications, see what to look first and assess the methods and reasons for all the changes in the code. Thus, these notes are not merely code comments but they serve as a guide to the reviewers.

Since authors have to re-assess and explain their modifications while annotating the code, therefore it can help to show different flaws in the code prior to the beginning of the review. As a result, the review achieves a greater level of efficiency.

5.   Setup Quantifiable Metrics

In the beginning, you have to come up with the goals for the code review and brainstorm how to assess the effectiveness of the code. After certain goals are defined, it can help to reflect better whether or not the peer review is providing the required results.

You can use external metrics like “cut upon the defects from development by 50%” or “decrease support calls by 15%”. Therefore, you can get a better picture of how well your code is performing from an external outlook. Moreover, a quantifiable measurement is wiser rather than having an unclear objective to “resolve more bugs”.

It must be noted that the results of the external metrics are not realized too early. For instance, there will be no changes to the support calls till the release of the new version and users can use the software. Therefore, you should also judge internal process metrics for getting the number of defects, study the points which cause issues, and get an idea about how much time is being spent by your developer on reviewing their code. Some of the internal code review metrics are the following.

  • Inspection rate: It is measured in kLOC (thousands of lines of code) per work hour and represents the time required for reviewing the code.
  • Defect rate: It is measured in number of defects discovered for each hour. It represents the process to discover defects
  • Defect density: It is measured in number of defects for each kLOC. It represents the number of defects which are discovered in a code.

6.   Create Checklists

Checklists are vital for the reviews due to the fact that help the reviewer to keep tasks in mind. They are a good option to evaluate those components which might be forgotten by you. They are not only effective for reviewers but they can also aid the developers.

One of the tough defects to highlight is omission as it is obviously tough to identify a piece of code which was never added. A checklist is one of the best ways to address this issue. With checklist both the reviewers and author can verify that the errors have been resolved, the arguments in the function are tested to run with invalid values, and the required unit tests are generated.

Another good idea is to use a personal checklist. Each developer often repeated the same errors in their code. If the creation of personal checklist is enforced then it can help the reviewers.


Tips to Manage Garbage Collection in Java


With each evolution, garbage collectors get new improvements and advancements. However, garbage collections in Java face a common issue: unpredictable and redundant object allocations. Consider the following tips to improve your garbage collection in Java.

1.   Estimate Capacity of the Collections

All types of Java collections including extended and custom implementations take advantage of underlying object-based or primitive arrays. Due to the size immutability of arrays after allocation, when items are added to a collection, a new array can force the old array to get dropped.

Many implementations of collections attempt optimization of the re-allocation process and try to limit it an amortized restriction, whether or not the expected collection size is not given. To get the best results, give the collection its expected size during creation.

For instance, consider the following code.

public static List reverse(List < ? extends T > list) {

List answer = new ArrayList();

for (int x = list.size() – 1; x > = 0; x–) {

answer.add(list.get(x));

}

return answer;

}

In this method, a new array is allocated after which another list’s items fill it via a reverse order. In this code, optimization can be applied to the specific line which performs addition of items in the new list. Whenever an item is added, the list has to ensure that there are enough available slots in the underlying array so it can store the incoming item. If there is a free slot, then it can easily store it. Or else, it has to perform allocation of a new underlying array, move the content of the old array to the newer one, and then perform the addition of the new item. As a result, multiple arrays are allocated which are ultimately collected by the garbage collection.

In order to avoid these redundant and inefficient allocations, you can “inform” the array about the number of items it can store while creating it.

public static List reverse(List < ? extends T > list) {


List answer = new ArrayList(list.size());


for (int x = list.size() – 1; x > = 0; x–) {

answer.add(list.get(x));

}

return answer;

}

As a result, the first allocation from the constructor of the ArrayList is big enough to store the items of the list.size(), thus there is no need for reallocation of memory in the middle of an iteration.

2.   Compute Streams with a Direct Approach

While data is being processed like it is downloading from the network or read from the file, then it not uncommon to view the following instances.

byte[] fData = readFileToByteArray(new File(“abc.txt”));

As a result, the byte array a JSON object, XML document, or Protocol Buffer message can then be used for parsing. While working with bigger files or files having uncertain size, there are possibilities of exposure to OutOfMemoryErrors if buffer allocation of the complete file is not performed by the Java Virtual Machine.

In case, we assume that the data size can be managed, the above-mentioned pattern can lead on to generate considerable overhead for garbage collection because a huge blob is allocated on the heap for holding the data of the file.

There are better solutions to tackle this. One of them is the use of the relevant InputStream and use the parser directly before converting it into a byte array. Usually, all crucial libraries are known to have API exposure for direct streams parsing. For instance, consider the following code.

FileInputStream fstream =new FileInputStream(fileName);

MyProtoBufMessage message = MyProtoBufMessage.parseFrom(fstream);

3.    Make Use of Immutable Objects

Immutability brings a lot of benefits to the table. Perhaps, its biggest one is on the garbage collection. An object in which you cannot alter the fields after the construction of the project is known as an immutable object. For instance,

public class twoObjects {

private final Object a;

private final Object b;

public twoObjects(Object a, Object b) {

this.a = a;

this.b = b;

}

public Object getA() {

return a;

}

public Object getB() {

return b;

}

}

The instantiation of the above-mentioned class provides an immutable object in which all the fields are set as ‘final’ and cannot be altered.

Immutability means that objects which are referenced via an immutable container are generated prior to the container’s construction. In terms of garbage collection, the container and the reference have the same age.

Therefore, while working with cycles of garbage collections for young generations, the garbage collection can ignore the older generations’ immutable objects as they are unable to reference.

When there are lesser objects for scanning, it requires less memory and also saves up on garbage collection cycles, resulting in improved throughput.

4.   Leverage Specialized Primitive Collections

The standard collection library of Java is generic and convenient. It assists in using semi-static type binding in collections. This can be advantageous if, for instance, you have to use a string set or work with a map for strings lists.

The actual issue emerges when developers have to store a list contains “ints” or a map containing type double values. As it is not possible to use primitives with generic types, another option is the use of boxed type.

Such an approach consumes a lot of space because an Integer is an object having a 12-byte header and a 4-byte int field. In total each Integer item amounts to 16 bytes—four times the size of the similar primitive int data type. There is another issue that the object instances of these integers have to be assessed for garbage collection.

To resolve this issue, you can use the Trove collection library. It provides a few generics over specialized primitive collections that are memory efficient. For instance, rather than using the Map<Integer, Double>, you can use the TIntDoubleMap.

TIntDoubleMap mp = new TIntDoubleHashMap();

mp.put(6, 8.0);

mp.put(-2, 8.555);

The underlying implementation from Trove works with primitive arrays, hence no boxing occurs during the manipulation of collections and objects are not hold in the primitives’ place.


Serverless Predictions for 2019


Are you using a serverless architecture?

As it was seen in 2018, more and more businesses are coming to serverless computing, especially to Kubernetes. Many of them have even started reaping the benefits of their efforts. Still, the serverless era has just started. In 2019, the following trends are going to change how the organizations create and deploy software.

Adoption in the Enterprise Software

In 2018, serverless computing and FaaS (function as a service) began to become popular among organizations. By the end of 2019, these technologies will go onto the next level and are poised to get adopted on a wider scale, especially for the enterprise application sector. As container-based applications—using the cloud-native architecture—are spreading with a rapid pace, it has served as a catalyst for the burgeoning adoption of serverless computing.

Today, software delivery and deployment has evolved to a great extent. The robustness and range of containers increased the cloud-native applications to unprecedented heights for legacy applications and Greenfield. As a result, business scenarios in which earlier there was not much progress for cloud-native modernization—like data in transit, edge devices, and stateful applications—can be converted into cloud-native. While container-based and cloud-native systems are beginning to experience a rise, software developers are using serverless functions for performing a wide range of tasks across various types of applications. Teams will now deliver microservices transition on a large scale—some may use FaaS to decrease the application’s complexity.

Workflows and similar high-end functionalities in FaaS are expected to provide convenience in creating complicated serverless systems via a composable and modular approach.

Kubernetes as the Defacto Standard

There are fewer better infrastructures than Kubernetes for working with serverless computing. By 2018, Kubernetes was widely used with container orchestration with different cloud providers. As a result, it is the leading cloud-native systems’ enabler and is on its way to becoming the defacto operating system. Ubiquity assists Kubernetes to be transformed into the default standard which can be used for powering serverless systems.

Kubernetes helps to easily create and run those applications in serverless architecture which can utilize cluster management, scaling, scheduler, networking, service discovery, and other powerful built-in features of Kubernetes. Serverless runtime needs these features with interoperability and portability for any type of environment.

Due to Kubernetes position as the standard for the serverless infrastructure, organizations can make use of their own multi-cloud environments and data centers for running serverless applications, rather than being restricted with a single cloud service and face excessive cloud expenses. When organizations will take advantage from cost savings, speed, and enhanced serverless functionality with their own data centers while at the same t time in different environments, they can port serverless applications, then the end result is impactful—the serverless adoption in the enterprise gets a massive boost. It not only becomes a strong architecture for the acceleration of new applications’ development, but it is also a worthy pattern which can help to modernize legacy applications and brownfield.

In cloud-native architecture, the increased refinement of Kubernetes deployments means that you can foresee the Kubernetes-based FaaS frameworks to be integrated with chaos engineering and service meshes concepts. To put it simply, if we consider the next Kubernetes as the next Linux, then serverless can be considered as the modern Java Virtual Machine.

Serverless with the Stateful Applications

Stateless applications with short life spans are used mainly by serverless applications. However, you can now also expect a more rapid serverless adoption having stateful scenarios—which are powered by improvements in advancements in both Kubernetes-based storage systems and serverless systems.

These workloads can consist of validation and test of machine learning applications and models which execute high-end credit checks. Workflows are going to be a major serverless consideration which can make sure that all the use cases only are not only executed properly but can also scale according to requirements.

Serverless Tooling Enters a New Age

Lack of tooling has been an issue for FaaS and serverless computing for a long time. This encompasses the operational and developer team ecosystem support and tooling. In 2019, the major FaaS projects are expected to take a more assembly line tooling view while using the enhanced experience of the developer, and smooth pipelining and live-reload.

In 2019, GitOps will achieve newfound recognition as a FaaS development paradigm. Hence, now all the artifacts can use Git for versioning and roll forwards or rollbacks can resolve the common versioning issues.

Cost Is Going to Raise Eyebrows

As the graph of last years suggests more and more enterprises are going to use serverless architectures to power mission-critical and large-scale applications; thus this also stretches the expenses and costs of serverless computing for public clouds. Consequently, cloud-lock is also expected to become a significant concern.

By the end of 2019, organizations will manage cloud expenses and provide portability and interoperability via standardization on those serverless systems that are open source—similar to Kubernetes. They can also make use of the strategies for utilizing the most efficient cloud provider while avoiding reliance on re-coding while at the same time serverless is being run via private clouds. This can have a major effect and help to enhance resource utilization and improve the current infrastructure. The impact will also touch the investment which was put in on-premise data centers for delivering the identical experience of developers and cloud operations—like how it works in the public cloud.

Before the start of 2020, it can be expected that these 2019 predictions will serve as the foundation of adoption of serverless architecture. All the single applications will be modeled in terms of services, triggers will be used for execution, and they run till the service request is satisfied. As a result, the model can simply how to code software along with ensuring that quick speed is also possible while keeping in mind both the expenses and security of the software.

Risks of Cloud APIs


An application programming interface (API) allows developers to establish a connection with services. These services can be cloud services and assist with updating a DB, storing data, pushing data in a queue, moving data, and managing other tasks.

APIs play an important role in cloud computing. Different cloud providers depend on various API types. Consumers debate on portability and vendor lock-in issues. AWS leads the market, holding its position as the de facto standard.

A cloud API is a special category of API which facilitates developers to develop services and applications which are needed for provisioning software, hardware, and platforms. It acts as an interface or gateway which may be indirectly or directly responsible for the cloud infrastructure.

Risk of Insecure APIs

Cloud APIs help to simplify many types of cloud computing processes and automate various complex business functionalities like configuration of a wide range of cloud instances.

However, these APIs need a thorough inspection of cloud customers and cloud providers. If a cloud API has a security loophole then it can create a number of risks pertaining to availability, accountability, integrity, and confidentiality. While the providers of cloud services have to be vigilant around securing their APIs, their mileage can differ. Hence, it is necessary to learn how you can assess the cloud API security. In order to evaluate cloud APIs, this report discusses several areas of concerns like what cyber threats do they exactly represent? How do the risks operate? How is it possible for companies to evaluate and protect these cloud APIs? Some of these areas where the customers have to be vigilant are as follows.

Transport Security

Generally, APIs are provided through a wide range of different channels. Those APIs which hold and store private and sensitive data require a greater level of protection via a secure channel like IPSec or SSL/TLS. Designing the tunnels of IPSec for a customer and CSP (cloud service provider) is often complex and resource-intensive; therefore many eventually select SSL/TLS. As a consequence, a can of worms is opened in the form of multiple potential issues. These issues include the management and production of legitimate certificates from an external or internal CA (certificate authority), problems with end-to-end protection, platform service, and their configuration conundrums, and the integration of software.

Authorization and Authentication

Most of the clouds APIs emphasize on authorization and authentication—hence they are major considerations for a lot of clients. One can ask the cloud service provider questions like the following.

  • How easily can they handle the attributes of two-factor authentication?
  • Are the APIs capable enough to encrypt the combination of usernames and passwords?
  • Is it possible to create and maintain policies for fine-grained authorization?
  • What is the connectivity for internal IMS (identity management systems) and their attributes along with those which are offered by the cloud service providers’ APIs?

Code practices

If your cloud API processes XML or JSON messages or receive user and application input, then it is integral to test them properly so they can be evaluated for routine injection flows, schema validation, input and output encoding, and CSRF (cross-site request forgery) attacks.

Protection of Messages

Apart from making sure that the standard coding practices are used, other cloud APIs factors can include encryption, encoding, integrity validation, and the message structure.

Securing the Cloud APIs

After a company analyzes the concerns which the insecure cloud APIs can cause, they have to think about what practices and solutions they can implement in order to safeguard them. Firstly, you have to assess the cloud service provider’s API security; request them to provide the APIs documentation which can include reports and assessment results of the existing applications that can help to highlight the best audit results and best practices. For instance, take the examples of Dasein Cloud API which offers a comprehensive case study pertaining to the cloud APIs with extensive and open documentation.

Additionally, other than documentation, clients can request their cloud service providers so they can operate vulnerability assignments and penetration tests for the cloud APIs. Sometimes, CSPs seek the service of other third-party providers to proceed with these tests. The final outcome is then shown to the clients with an NDA; this helps the client to assess the current cybersecurity of the APIs.

The APIs of the web services must be secured for the OWASP’s—Open Web Application Security Project—10 common considerations for security loopholes via the application and network controls. Additionally, they should be also protected for QA testing and development practices.

Several cloud service providers provide an authentication and access mechanism via encryptions keys for their customers to benefit from the APIs. It is necessary to safeguard these keys—for both the CSP and customers. There should be clear-cut policies to manage the production, storage, dissemination, and disposal of these encryption keys—they must be stored with the help of a hardware security component or a protected and encrypted file store can be used for them. Do not use the configuration files or similar scripts for key embedding. On a similar note, if keys are embedded directly into the code, then developers will have a tough time with updates.

Search for cloud security providers like Microsoft Azure and Amazon. They offer symmetric keys and authentication codes that run on a hash-based mechanism in order to provide integrity and refrain from spreading shared information between untrusted networks. If a third party intends to work with a cloud service provider’s API then they must abide by these considerations and view API security and protection keys as a major priority.

IoT Challenges and Solutions


Internet of Things still remains a relatively new technology for companies around the world. It is providing businesses with a lucrative opportunity to thrive and prosper in the future of “Things”. However, implementing the internet of things is easier said than done. Their deployments are complex. This means that you not only require the IT team but also need the business units and operations team to implement your IoT solutions. Some of the IoT challenges and solutions are listed below.

Cost

The expenses and costs incurred in migrating from traditional architecture to an IoT are significantly high. Companies should refrain from proceeding with this leap initially via a one-off stream. While there is nothing wrong with the overall vision to adopt IoT, it is difficult for the management to ignore costs.

To handle and mitigate these expenses, there are a number of projects with IoT implementations. They are quite cost-friendly and have defined goals, also called as ‘bite-sized’. Start your adoption slowly by utilizing pilot technologies and spend money via a series of phases. To manage additional costs, give a thought to SaaS (software as a service) to get on-premise and robust installations.

Moreover, evaluate those IoT projects which provide good value for money and go through the business cases documentation.

Security

Sending and receiving data on the Web is always one of the riskiest activities faced by the IT team. A major reason behind this is the latest onslaught of hacking which has engulfed the modern-day world as cybercriminals are attacking governments and businesses left and right. However, in IoT, the issue is more complex; not only have you to facilitate online data communication but also connect a lot of devices— creating more endpoints for the cybercriminals to attack. While assessing the security of your IoT application, consider the following.

Data at Rest

When databases and software store data through the cloud or on-premises architecture, such data is commonly known as “at rest”. To protect this data, companies rely on perimeter-based defense solutions such as firewalls and anti-virus. However, cybercriminals are hard to deter—for them this data offers lucrative opportunities in the form of several crimes like identity theft. Cybersecurity experts recommend that this issue can be resolved with the use of encryption strategies for both the hardware and software in order to ensure that the data is saved from any illegal access.

Data in Use

When an IoT application or a gateway uses data, then its access is often available for different users and devices and thus is referred to as data in use. Security analysts claim that data in use is the toughest to safeguard. When a security solution is designed for this type of data, mainly the security considerations assess the authentication mechanisms and focus on how to secure them so only the authorized user can access them.

Data in Flight

The data which is currently being moved is primarily referred to as data in flight. To protect this data, communication protocols are planned and designed by using the latest and most effective algorithms of cryptography; they allow blocking the cybercriminals from decoding the data in flight. You can use a wide range of internet of things equipment which provides an extensive list of security protocols—many of them are enabled by default. At the minimum, you should ensure that your IoT devices which are linked with the mobile apps or remote gateways utilize HTTPS, TLS, SFTP, DNS security extensions, and similar protocols for encryption.

Technology Infrastructure

Often, clients have IoT equipment which is directly linked to the SCADA (supervisory control and data acquisition). This means that they are ultimately responsible for the production of data that can help with analytics and insights. In case there is a lack of power monitoring equipment, the SCADA network can provide the relevant system to connect the newly-added instrumentation.

Secure networks often rely on one-way outbound-only communication. SCADA can facilitate the management of the equipment’s control signals.

You can use two methods for the protection of data for the APM data transmission. First things first, you can link the APM and the SCADA’s historian. The historian is a component which is required for the storage of the instruments’ readings and control actions and it resides in a demilitarized zone where it is required for the access of applications through the Internet. These applications only have access to look into the historian’s stored data.

You should know that SCADA only permits the writes to the DB. To do this, the historian sends the SCADA an outbound signal which is based on an interval. Many EAM (enterprise asset management) systems use the SCADA’s historian data to populate dashboards.

Another handy solution is to adopt a cellular service or any other independent infrastructure. This can help you to power your data communication without any dependence on a SCADA connection. The idea for uploading data—which is cellular in nature—is a wise one in facilities that have issues with the networking infrastructure. In such a setup, users can connect a cellular gateway device with a minimum of at least five devices while a 120-V outlet powers it. Today, pre-configured cellular equipment is offered by different companies, helping businesses to easily connect and deploy their IoT solutions within a few days.


Communication Infrastructure

The idea to use a cellular gateway for connecting internet of things equipment is smart. However, users who are close remote areas can struggle with reception. For such cases, you need to invest an enormous amount of money to develop the required infrastructure. LTE-M and LTE-NB may use the existing cellular towers but even then you can get a broader coverage from them.

This means that even while using the 4G-LTE data, if a user is unable to work with a good signal for voice calling, then they have a formidable option in the form on the LTE-M.

Four Layer and Seven Layer Architecture in the Internet of Things


Nowadays companies are aggressively incorporating internet of things into their existing IT infrastructures. However, planning to shift to IoT is one thing; an effective implementation is an entirely different ball game. Several considerations are required to develop IoT application. For starters, you need a robust and dependable architecture which can help with the implementation. Organizations have adopted a wide range of architectures along the years but the four layers and seven layer architecture are especially notable. Here is how they work.

Four Layer Architecture

The four-layer architecture is composed of the following four layers.

1.    Actuators and Sensors

Sensors and actuators are the components of IoT devices. Sensors collect and gather all the necessary data from an environment or object. It is then processed and becomes meaningful for the IoT ecosystem. Actuators are those components of IoT devices which can modify an object’s physical state. In standard four-layer architecture, data is computed at all the layers including in sensors and actuators. This processing depends upon the processing limits of the IoT equipment.

2.    The Internet Gateway

All the data which is collected and stored by sensors fall into the analog data category. Thus, a mechanism is required which can alter it and translate it into the relevant digital format. For this purpose, there are data acquisition systems in the second layer. They connect with the sensor’s network, perform aggregation on the output, and complete the analog-to-digital conversion. Then this result goes to the gateway which is responsible for routing it around Wi-Fi, wired LANs, and the Internet.

For example, suppose there is a pump which is integrated with many sensors and actuators; they send data to an IoT component so it can aggregate it and convert it into digital format. Subsequently, a gateway can process it and perform the routing for the next layers.

Preprocessing plays an important role in this stage. The sensor data produce voluminous amounts of data within no time. This data includes vibration, motion, voltage, and similar real-world physical values to create datasets with ever-changing data.

3.    Edge IoT

After the conversion of data into a digital format, it cannot be passed onto data centers before you can perform additional computation on it. At this phase, edge IT systems are used for the execution of the additional analysis. Usually, remote locations are selected to install them—mostly those areas which are the closest to the sensors.

Data in IoT systems require heavy consumption of resources such as the network bandwidth in the data centers. Hence, edge systems are utilized for analytics which decreases the reliance on computing resources. Visualization tools are often used in this phase to monitor data with graphs, maps, and dashboards.

4.    Cloud

If there is no need for immediate feedback and data must go under more strenuous processing, then a physical data center or cloud-based system routes the data. They have powerful systems that analyze, supervise, and store data while ensuring maximum security.

It should be noted that the output comes after a considerable period of time; however, you do get a highly comprehensive analysis of your IoT data. Moreover, you can integrate other data sources with actuators and sensors’ data for getting useful insights. Whether on-premises, cloud, or a hybrid system is used, there is no change in the processing basics.

Seven Layer Architecture

Following are the layers of the seven-layer architecture.

1.    Physical Devices

Physical equipment like controllers falls into the first layer of the seven layer architecture. The “things” in “internet of things” is referred to these physical devices as they are responsible for sending and receiving data. For example, the sensor data or the device status description is associated with this type of data. A local controller can compute this data and use NFC for transmission.

2.    Connectivity

Following tasks are associated with the second layer.

  • It connects with the devices of the first layer.
  • It implements the protocols according to the compatibility of various devices.
  • It helps in the translation of protocols.
  • It provides assistance in analytics related to the network.

3.    Edge Computing

Edge computing is used for data formatting which makes sure that the succeeding layer can make sense of the data sets. To do this, it performs data filtering, cleaning, and aggregation. Other tasks include the following.

  • It is used for the evaluation so data can be validated and computed by the next layer.
  • It assists in the data reformat to ease up high-level and complex processing.
  • It provides assistance in decoding and expanding.
  • It provides assistance in the data compression, thereby decreasing the traffic workload on the network.
  • It creates event alerts.

4.    Data Accumulation

Sensor data is ever changing. Hence, it is the fourth layer which is responsible for the required conversion. The layer ensures that data is maintained in such a state that other components and module of IoT can easily access it. When data filtering is applied in this phase, a significant part of data is eliminated.

5.    Data Abstraction

In this layer, the relevant data is processed for adhering to specific properties pertaining to the stored data. Afterward, data is provided to the application layer for further processing. The primary purpose of the data abstraction layer is data rendering keeping in mind its storage and using an approach through which IoT developers are easily able to code applications.

6.    Application

The purpose of the application layer is data processing so all the IoT modules can access data. Software and hardware layer are linked with this later. Data interpretation is carried out for generating reports, hence business intelligence comprises a major part of this layer.

7.    Collaboration

In this layer, response or action are offered to provide assistance for the given data. For instance, an action may be the actuator of an electromechanical device following a controller’s trigger.


IoT Design Patterns – Edge Code Deployment Pattern


Development with traditional software architectures and IoT architectures is quite different, particularly when it comes to the design patterns. To put it clearly, the detail and abstraction levels in IoT design patterns vary. Therefore, for creating high-quality IoT systems, it is important to assess various layers of design patterns in the internet of things.

Design patterns are used to add robustness and allow abstraction to create reusable systems. Keep in mind that design involves working with technical information and creativity along with scientific principles for a machine, structure, or system to execute pre-defined functions, enabling maximum efficiency and economy.

IoT helps to integrate the design patterns of both the software and hardware. A properly-designed application in internet o things can comprise of microservices, edge devices, and cloud gateway for establishing a connection between the Internet and the edge network so the users are able to communicate via IoT devices.

Development for configuring systems and linking IoT devices come with an increased level of complexity. Design patterns in IoT tackle issues to manage edge applications starting from initialization and going towards deployment. In developing IoT applications, edge deployment pattern is one of the most commonly used design patterns.

Edge Code Deployment Pattern

Problem

How to make sure the developers are able to deploy code bases for several IoT devices and ensure that they achieve the required speed. Similarly, there are also concerns regarding the security loopholes of the application. Additionally, it includes how to configure IOT devices while not worrying about the time-consuming phases of build, deployment, test, and release.

Considerations

One of the primary factors for deploying a portion code is maintainability for deploying IoT devices which are remotely based. When developers resolve bugs and enhance the code, they want to add to ensure that this updated code is deployed to its corresponding IoT devices as soon as possible. This assists with the distribution of functionality across IoT devices. After some time, the developers may be required to perform reconfiguration of the application environment.

Let’s consider that you are working on an IoT system which uses billboards to show advertisements in a specific area. Throughout the day, your requirements include modifying the graphical and textual elements on the screen. In such a case, adaptability and maintainability emerge as two of the toughest challenges where the developers are required to update and deploy the code to all the corresponding IoT devices simultaneously.

Often networking connectivity slows down the internet of things ecosystem. To combat this dilemma, you can incorporate the relevant changes rather than proceeding the complete application upload with a network that is already struggling to maintain performance.

Developers are required to consider programming as their primary priority and search for the right tools which can assist with their development. It is important to ensure that the IoT devices’ code deployment tools remain transparent so it can help the developers. This can assist in achieving a deployment environment that is fully automated.

Subsequently, the safety of operations is also improved. As discussed before, your development pipeline should be aimed at building, deploying, testing, releasing and distributing the application for the devices in the internet of things ecosystem.

For testing, you can use the generated image with an environment that resembles the production environment and initiate your testing. After the completion of the tests, the IoT devices take out the relevant image. This image is derived out from the configuration files, the specification of the container, and the entire code. One more aspect is that there is a need for a mechanism which can help coders to rollback their deployment to a prior version so they do not have to deal with outage—something which is quite important for the IoT devices.

Additionally, for the new code requirements, the deployment stage has to contain and consider configurations and dependencies of the software. For this purpose, they need reconfiguration for the environment of the application and the entire tech stack via safely and remotely to maintain consistency.

Solution

Since in recent times developers are extensively using version control systems, it can help with deployments as well. Today, Git is heavily used by developers for maintaining versioning and sharing code. Git can serve as the initial point for triggering the building system and proceed with the deployment phase.

Developers can use Git for pushing a certain code branch at the server’s Git repository which is remotely based so it gets alerts about the software’s new version. Afterward, they can use hooks for triggering the build system initiating the following phase where they can deploy the code in the devices. A new Docker image is built by the build server which adds the image’s newly-created layers. They are received by the central hub of Docker so the devices can pull. With this strategy, a developer can use any version control system like Git to deploy code when the IoT devices are distributed geographically.

After regular intervals, these devices can inquire the central hub or registry to see if there are any new versions. Similarly, the server itself can alert the devices of a new image version release. Afterward, the newly-created image layers are pulled by the IoT devices where they generate a container and make use of the new code.

To summarize, after there are changes in the code, Git is used for commits and pushes. Subsequently, a freshly-built Docker image is created and moves to the IoT devices which then makes use of the image for generating a container and utilizing the code that has been delayed. Each commit starts the deployment pipeline and modifies the source code—thereby it is published for all the devices.

IoT Design Challenges and Solutions


The development of the internet of things architecture is riddled with various challenges. It is important to understand that there is a major difference between designing desktop systems and web applications in comparison to developing an IoT infrastructure as the latter has different hardware and software components. Hence, you cannot use the same traditional approach with your IoT applications which you have been using in the past with web and desktop software. What you can do is that consider the following IoT design challenges and solutions.

1.   Security

One of the key considerations in an IoT ecosystem is security. Users should have trust in their internet of things equipment which can help to share data easily. The lack of secure design means that IoT devices can encounter different types of security vulnerabilities in all of their entry points. As a result of these risks, private and business data can be exposed which can lead to compromise the complete infrastructure.

For example, in 2016, Mirai first arrived on the internet. Mirai is a type of botnet which went on to infect the IoT devices of a major telecommunications company in the US: Dyn. As a consequence, a large number of users were disconnected and they were without any internet connectivity. DDoS was one of the key hacking strategies which were used by hackers.

Solution

A considerable portion of the responsibility to secure IoT devices falls into the hands of the vendors. IoT vendors should incorporate security features in their devices and make sure to update them periodically. For this, they can use automation to perform regular patching. For instance, they can use Ubuntu in tandem with Snap which can help in a quick update of devices. These atomic styles assist developers in the writing and deployment of patches.

Another strategy is to ensure that DDoS attacks are prevented. For this, you have to configure routers so they can drop junk packets. Similarly, irrelevant external protocols like ICMP should be avoided. Lastly, a powerful firewall can do wonders and make sure to update the server rules.

2.   Scalability

By 2020, Cisco predicts that there will be around 50 billion functional IoT devices. Therefore, scalability is a major factor to handle such an enormous number of IoT devices.

Solution

For scalability, there are many IoT solutions which are not only scalable but are also reliable, flexible, and secure. For instance, one of the most common data management infrastructures is Oracle’s Internet of Things. This solution provides many efficient services that help with the connection of a large number of IoT devices. As Oracle is known to be a massive ecosystem with different services and products integrating into its architecture, thus they can help to fix a wide range of concerns.

For mobile development in your IoT ecosystem, you can use Oracle Database Mobile Service—a highly robust solution that helps to create a connection between embedded devices and mobile apps while fitting all the scalability requirements. There is also an option to use a scalable database like Oracle NoSQL Database which can offer you a chance to work on the modern “NoSQL” architecture.

3.   Latency

Latency is the time period which data packets take to move across the network. Usually, latency is measured through RTT: round-trip time. When a data packet goes back and forth from a source to its destination, the time it requires to do this is known as RTT. Milliseconds are needed to measure the latency of data centers where the range is fewer than 5 milliseconds.

IoT ecosystem usually employs several interconnected IoT devices at once. Thus, the latency increases as the network become heavier. The cloud is seen as the edge of the network by the IoT developers. It is necessary to understand that latency issues can affect even routine IoT applications. For instance, if you have an IoT-based automation system in your home and you turn on a fan then latency issues related to cloud processing, gateway processing, wireless transmission, sensing, and internet delivery can arise.

Solution

The latency issue is quite complex. It is imperative that businesses must learn the management of latencies if they plan to use cloud computing effectively. Distributed computing is one of the components which raises the cloud latency’s complexity. Application requirements have changed. Rather than using a local infrastructure for storage, services are distributed internationally. Additionally, the birth of big data and its tools like R and Hadoop are also boosting the distributed computing sector. Internet traffic has made latencies dependent on such scale that they find it hard to utilize similar bandwidth and infrastructure.

Another issue which plagues the developer is the lack of tools that can help with the measurement of the latest applications. Traditionally, connections over the internet were tested via the traditional ping and traceroute. However, this strategy does not bode well today as ICMP is not required for modern-day applications and networks in IoT. Instead, they need protocols like HTTP, FTP, etc.

By traffic prioritization and focusing on QoS (Quality of Services), you can address cloud latency. Before the birth of modern cloud computing, SLAs (Service Level Agreements) and Quality of Services were used to make sure that traffic prioritization was done well and ensure that latency-sensitive applications can use the suitable resources for networking.

Back-office reporting can force applications in accepting decreased uptime but the issue is that a lot of corporate processes cannot sustain the downtime because it causes major damage to the business. Therefore, SLAs should concentrate on specific services by using performance and availability as metrics.

Perhaps, the best option is to connect your IoT ecosystem with a cloud platform. For instance, you can use Windows Azure which is quite is powerful and robust, and can particularly serve those businesses which plan to develop hybrid IoT solutions—in such infrastructure on-premises resources are used for the storage of a considerable amount of data while cloud migration help with other components. Lastly, the collocation of IoT components to third-party data centers can also work out well.

What Should You Know Before Implementing an IoT Project?


By the end of 2019, more and more enterprise IoT projects are expected to be finished. Some of them are in the stage of proof of concept while there are some projects which ended badly. The reason behind this is that project managers were late to understand that they were fast-tracking the implementation of the IoT projects without thinking much. As a consequence, they were left to regret not consulting and analyzing properly.

Different industries and businesses use the internet of things for various applications, however, IoT fundamentals are unchangeable. Before implementing an IoT project, consider the following factors.

Cultural Shift

Organizational and cultural shift emerge as one of the leading issues in the internet of things. For example, take the example of a German cleaning manufacturer: Kärcher. The company’s digital product director, Friedrich Völker, gave a brief explanation of how the company was able to address this issue during its release of an IoT-based fleet management project. He explained that their sales team was struggling in marketing and advertising the software and virtual offerings of the internet of things as they dealt with their customers.

After some time, the sales department refrained from concentrating on a one-off sale. They instead focused their efforts on fostering relationships with the customers to get input on the ongoing performance of the IoT equipment. As a result, they achieved success.

Initiatives related to the internet of things are usually included in the digital transformation of companies which often needs adoption of the agile-based methodology along with the billing procedures for offering support to either pay-per-use based billing or subscription-based customer billing. Therefore, always commit to the efforts of change management in the organization and make use of the agile approach.

Duration of IoT Projects

Businesses need to understand that the implementation of the internet of things needs a considerable amount of time. There are examples where the IoT implementation from the development of the business case to the commercial release took less than a year—the quickest time was 9 months. On average, expect an IoT project to run for at least 24 months.

There are many reasons for such a longer duration of IoT projects. For instance, sometimes the right stakeholders do not have the buy-in. In other cases, there can be a technical problem such as not using an infrastructure which provides scalability support.

Profitability cannot be expected for the initial years; many companies are concentrating on the performance of their internet of things solutions instead. Thus, you have to ensure that the stakeholders are patient and create smaller successes which can provide satisfaction to both the senior management and the shareholders.

Required Skills

Development of end-to-end applications in the internet of things needs a developer to have an extensive set of skills such as cloud architecture, data analytics, application enablement, embedded system design, back-end system integration like ERP, and security design,

However, IoT device manufacturers do not have much experience of the technology stack in the internet of things like AMQP or MQTT protocols, edge analytics, and LPWAN communication. Studies indicate that there is especially a wide gap of skills in the data science domain. To address these concerns, adhere to the following.

  • Map the gap of skills in your IoT project.
  • Make sure that your employees become the jack of all trades .i.e. do not limit them with a single domain—instead encourage a diverse skill set, especially with a focus on the latest IoT technologies.
  • Fill up your experience gap with the help of IoT industry experts so their vast expertise and experience can help you to provide a new level of stability in your project.

Interconnectivity

In this age, users are quite casual with the use of technology; they download and install an application on a smartphone within a few minutes and begin using them without any other thoughts. IoT adopters believe that IoT devices will provide a similar user experience.

On the contrary, one of the most time-consuming aspects in the development of the internet of things solutions is the protocol translation. For instance, in one case, the internet of things implementation for an industrial original equipment manufacturer (OEM) required almost 5 months to design all the relevant and mandatory protocol translations. It was only after such a prolonged time period that the IoT applications and equipment were able to function seamlessly. Therefore, make sure you can create a standardized ecosystem which falls in the scope of your industry and use case.

Scalability

Not many people report it but a large number of IoT devices can generate scalability issues. When such an issue arises, device manufacturers cannot do much as the device is already released and sold in the market.

For instance, once a construction equipment manufacturer designed tidy dashboards for the remote monitoring of machines. After some time, the IoT infrastructure was revamped such that predictive maintenance and the hydraulic systems’ fault analysis could be performed. At this phase, it was first realized that the data model was not supported by the required processing capacity. Similarly, there were instances in which the processing power was weak and restricted the manufacturer into adding different functionalities.

While you should always begin small, your vision and planning should be grand from day one. Design your IoT with a modular approach and challenge your data model and hardware design.

Security

Often, security is cut off from the development of IoT devices. This is because many consider security as merely an afterthought while embarking on a mission to create IoT technologies. However, device and data security have a prominent role in the development of the internet of things development.

For instance, some manufacturers of Connected Medical Devices use the services of an ethical hacker. This hacker looks for any possible security loopholes in the IoT project. To do this, they use a wide range of strategies for rooting IoT equipment, lift, penetrate, and alter its code.

Microsoft Azure with Augmented Reality


Microsoft has its hands full with AR (augmented reality). The release of Azure Kinect camera and HoloLens 2 headset indicates the intent of Microsoft to become a pioneer in the next big technology, augmented reality.

Microsoft Azure has been combining several technologies at once. It does not use every available tool to create a user experience for HoloLens or any other standalone device. Instead, it uses your models and fixes them for a particular physical location. When data is collected by Azure, you can use Google’s ARCore or Apple’s ARKit to access that data.

Microsoft’s new AR solutions have links which serve as a connection between the physical and virtual realms. Microsoft has termed them as spatial anchors. Spatial anchors are maps which apply to lock on the virtual objects for the physical world which is used to host the environment. These anchors offer links through which you can display a model’s live state across several devices. You can link your models to different data sources, thereby offering a view which can integrate well with IoT-based systems as well.

Spatial Anchors

Spatial anchors are intentionally made to function across multiple platforms. The appropriate libraries and dependencies for the client devices can be availed via services like CocoaPods while taking advantage of native programming language code as that of Swift.

You have to configure the accounts in Azure to ensure authentication for the services of the spatial anchors. While Microsoft is still using Unity, there are some indicators that it may support the Unreal Engine in the near future.

In order to utilize this service, it is necessary to first generate a suitable application for the Azure service. Partial anchors in Azure offer support to the mobile back-end of Microsoft so they can be used as service tools and the learning curve does not become too complex.

After you initiate and run an instance of the Azure App Service, you can use REST APIs to establish communication between your spatial anchors and client apps.

Basically, spatial anchors can be seen as an environment map to host your augmented reality content. This can include the use of an app to search for users in an area and then create its corresponding map. HoloLens and similar AR tools can replicate this functionality automatically. On the other hand, in some AR environments, you might have to process and analyze an area scan to construct the map.

It is important to note that anchors are generated by the AR tools of the application after which Azure saves them as 3D coordinates. Moreover, an anchor may have extra information attached to it and can use properties to assess the rendering and the link between multiple anchors.

Depending upon a spatial anchor’s requirement, it is possible to set an expiration date if you don’t want them to remain permanent. After the expiration date is passed, users can no longer see the anchor. Similarly, you can also remove anchors when you do not want to display any content.

The Right Experience

One of the best things about spatial anchors is its in-building navigation. With linked anchors and the appropriate map, you can create navigation for your linked anchors. To guide users, you can include tips and hints in your apps like the use of arrow placement to indicate the distance and direction for the next anchor. Through the linking and placement of anchors in your AR app, you can allow users to enjoy a richer experience.

The right placement on the spatial anchors is necessary, it helps users to enjoy an immersive and addictive user experience or else they can get disconnected with the app or game. According to Microsoft, anchors should be stable and link with physical objects. You have to think about how they are viewed to your user, factor all the possible angles, and make sure that other objects do not obstruct access to your anchors. The use of initial anchors for definite entry points also decreases complexity, thus making it more convenient for users to enter the environment.

Rendering 3D Content

There are plans by Microsoft to introduce a service for remote rendering which will use Azure to create rendered images for devices. However, the construction of a persuasive environment requires a great deal of effort and detail. Hardware like HoloLens 2 may offer a more advanced solution but delivering rendering in real time is a complicated prospect. You will require connections which run on high bandwidths along with a service for remote service. This service is necessary so you can pre-render your images with high resolution and then deliver them to the users. This strategy can be reapplied across multiple devices where the rendering processing runs once after which it can be used several times.

Devices can be classified under two types: untethered and tethered. Untethered devices with low-level GPUs are unable to process complex images. As a consequence, the results limit image content and deliver a lesser number of polygons. Conversely, tethered devices fully use the capabilities of GPUs which are installed in workstations with modern, robust hardware and thus are able to display fully rendered imagery.

It has been a while since GPUs have become prominent in the public cloud scene. Most of the support which Nvidia GPU provides to Microsoft Azure is based on cloud-hosted compute on a large scale and CUDA. It provides multiple NV-class virtual machines which can be used with cloud-based visualization apps and sender hosts.

Currently, Azure Remote Rendering is still a work in progress and there has been no announcement to explain its pricing strategy. By leveraging the power of Azure Remote Rendering and using it with devices like HoloLens, you can use your portable devices to execute complex and heavy tasks and ensure that you can deliver high-quality images.

Practical Applications of Machine Learning in Software Delivery


The DevOps survey explains how certain practices help in creating well-performing teams. However, it also sheds light on the gap which is created between two teams—one which works with a quality culture and the other without one.  In order to bridge this gap, machine learning has been cited as one of the solutions. So, how can machine learning change the game?

Save Time in Maintenance of Tests

Many development teams suffer from false positives, mysterious test failures, false negatives, and flaky tests. Teams have to create a robust infrastructure for analytics, monitoring, and continuous delivery. They then use automated tests and use test-driven development for both their user interface and APIs. As a consequence, a lot of their time is spent on maintaining their tests.

This is where machine learning can be useful and automate such tests. For example, the auto-healing functionalities of mabl can be used for such purpose. Algorithms of mabl are optimized in order to pick the target element for which interactions are required for a journey.

Many factors and considerations are needed to create maintainable automated tests, however, the capability of user interface test in assessing the change and execute accordingly saves a considerable amount of time. It may be possible to apply these benefits for the other types of tests too. The automation of tests for the service or API level is significantly less taxing in comparison to the user interface; however, they also need maintenance along with the modifications of the application. For instance, machine learning can be required to choose new API endpoints parameters and place some other automated tests for covering them.

Machine learning is great at consuming large amounts of data and learn from it. The idea to assess and determine failures in tests for the detection of patterns is one of the best advantages of machine learning.  You may even get to find an issue prior to the failure of any test assertions.

More on Testing

You can work around your test and production code in such a way that along with information about errors, it can also log the information pertaining to an event’s failure. While this sort of information can be too big size for a human to make sense out of it, machine learning is not restricted by such limitations. Therefore, you can use it to create meaningful output.

Machine learning can assist in the design of reliable tests which saves up on time. For instance, it can detect anti-patterns in the code of test. Similarly, it can identify those tests which can be marked with a lower priority or identify those system modules which can be mocked so a test runs quicker.

Like mabl, concurrent cloud testing increases the speed of continuous integration pipelines. However, when end-to-end tests are run in a website browser, then their speed is slow in comparison to those tests which run in the browser’s place.

Testers use machine learning to get recommendations like which tests should be automated with regards to their importance or when to automatically create such tests. To do this, a production code’s analysis can assist to pinpoint problematic areas. One application of machine learning is a production usage analysis to discover user scenarios and automatically generate or recommend the creation of automated test cases for covering them. The optimization of time which is needed to automate tests can be replaced by an intelligent automation mechanism of the most necessary ones.

You can use machine learning to assess production use and see how to get the application’s user flows and collect information about the accurate emulation of production use for security, accessibility, performance, and another testing.

Test Data

The creation and maintenance of data which is similar to production consist of different automated tests. Often, serious problems fail to get detected in production as the problematic edge needs a data combination which is not replicable in standard test environments. Here, machine learning can locate a detailed, representative, and comprehensive production data sample, eliminate any possible privacy concerns and produce canonical test data sets which are required by manual exploratory testing and automated test suites.

You can equip your production code, log detailed events data, and configure production alerts and monitoring—this can assist in a quicker recovery. Decreasing MTTR (mean time to recovery) is a nice objective whereas low MTTR is linked with high performance. For domains where the level of risks is particularly higher like in real life critical applications, you may have to use exploratory testing to decrease the possibilities of failure.

Human Factor

While context differs, however, most of the time, it is not advised to experiment with all types of automated testing in types. Thus, human eyes and similar senses are required along with the thinking skills to assess and be informed about the types of risks which can hit the software in the future.

The automation of boring stuff is also necessary so it can help testers for the interesting testing. Among the machine learning applications, one of the initial for test automation is visual checking. For instance, screenshots of all the visited pages are used by mabl to create the visual models of the automated functional journey. It identifies those parts which must change like ad banners, date/time or carousels. Similarly, it rejects new modifications in these areas. It is used for the shrewd provision of alerts whenever visual differences are detected for the areas which must look the same.

In case you have executed visual checking all by yourself through viewing a user interface website page in the production along with testing the same element, then you can understand how heartbreaking it can be. Thus, machine learning can help here to complete all the repetitive and tedious tasks.

7 Effective DevOps Tips to Transform the IT Infrastructure of Your Organization


DevOps refers to a group of modern-day IT approaches and practices which are designed to join operations and IT staff members (generally software developers) on a project with unforeseen levels of collaboration. The idea is to eliminate the traditional hurdles and barriers which have historically plagued cooperation between these departments, resulting in losses to an organization. Therefore, DevOps quickens the deployment of IT solutions. As a result, development cycles are optimized and shortened, saving money, time, staff, and other resources.

In the last few years, DevOps has commanded a strong presence in the IT circles. Despite its popularity as a useful approach, the domain lacks visibility and suffers from improper implementations. As a result, the operation and development departments are unable to leverage its maximum advantage. The integration of DevOps is needed in organizations where the IT leadership has its own strategy for its implementation.

As DevOps gains greater recognition, its community has managed to discuss the best practices which can help organizations improve collaboration and develop higher quality IT solutions. Following are some of the DevOps tips that can help you propel your IT department in the right direction through clean coding and optimized operations.

1.     Participation from the Concerned Parties

One of the founding principles of DevOps is to ensure that the operations personnel, the development professionals, and the support staff are facilitated to work together at regular intervals. It is important that all of these parties recognize the importance of each other and are willing to collaborate.

One of the well-known practices in the agile industry is the use of onsite customer where the agile development team operates the business by offering their support. Experienced professionals are known to adopt stakeholder participation practice. This practice recommends developers to expand their horizons and work closely with all the concerned parties other than the customer.

2.     Automated Testing

An agile software engineer is always expected to spend a considerable amount of time in quality programming along with focusing on testing. This is why automated regression testing is a recurring tool in the toolbox of agile developers. Sometimes, it is modeled as behavior-driven development or test-driven development.

One of the secret ingredients for the success of agile development is the fact that these environments are continuously run daily tests to identify issues quickly. Subsequently, they also receive rapid fixing. As a result, such environments are able to attain a greater degree of software quality in contrast to the traditional software approaches.

3.     Addition of “I” in Configuration Management

Configuration management is a set of standard practices which is required to monitor and manage changes in the software lifecycle. Previously, configuration management was ineffective because it was too limited. DevOps has allowed adding “I” in the CM equation, which has produced integration configuration management. This means that along with the implementation of CM, developers are also analyzing problems related to production configuration which originates between the infrastructure of the company and the proposed solution. This is a key change because developers were not too concerned about such variables in the past and only focused on CM in terms of their solutions.

DevOps promotes a fresh brand of thinking which targets enterprise-level awareness and offers visibility to a more holistic picture. The ultimate goal of integrated configuration management is to ensure that developer teams are equipped with the knowledge about all the dependencies of their solutions.

4.     Continuous Integration

When a project’s development and validation undergoes automated regression testing along with optional code analysis (after the code is updated via version control system), the approach is labeled as continuous integration. CI evokes positive responses from agile developers working in a DevOps environment. With support from CI, developers have been able to design a working product with gradual and regular coding while any code defect is promptly addressed through immediate feedback.

5.     Addition of I in DP

Traditionally, deployment planning was done with cooperation from the operation department of organizations whilst at times the release engineers were also consulted. Those who have been in the industry for a long period of time are compliant with this planning from the assistance received from active stakeholder participation.

In DevOps, one is quick to come to the understanding that a cross-team is necessary in deployment planning so the staff from the operations department is easily able to work with each of the development teams. Such practice may not be anything new for the operations staff, though development teams would find it the first instance due to their restrained nature of duties.

6.     Deployment

The methodology of CI is further enhanced through continuous development. In CD, whenever integration is met with success in a single sandbox, the modifications are sent to the upcoming sandbox as a sort of promotion. The promotion can only be stopped when the modifications require verification from people who serve the operations and development.

With CD, developers are able to decrease the time duration elapsed between the identification of a new feature and its deployment. Companies are becoming more and more response thanks to CD. Though, CD has raised some eyebrows for operational risks where errors maybe originated during the production due to the negligence of the developers.

7.     Production

In high-scale software environments, often software development teams are engaged in updating a new release of a product which is already established .i.e. it is in production. Hence, they are not only required to spend time on the newer release but also handle any incoming issues in the production front. In such cases, the development team is effectively the third level of application’s support as they are expected to be the third and last set of professionals to respond to any critical production issues.

Final Thoughts

Do you work with enterprise-level development?

In this day and age, DevOps is one of the most useful tools for large organizations. Follow the above-mentioned tips and improve the efficiency of your IT-related solutions and products within a short period of time.

Revolutionizing Call Centers with Speech Analytics


As the world entered into a new millennium in the year 2000, few people would have predicted how the next 19 years would completely change the face of several industries. All this transformation was made possible through the rising IT juggernaut. One such industry was the call center industry. Traditionally, the industry focused on dealing with as many customers as it could within a certain time period. Times have changed since then, and now the objective is to get the approval of customers by fixing their issues and generate quality CX (customer experience).

This paradigm shift was supported by speech analytics, which refers to a practice in which the voice of customers undergoes analysis and processing. This voice is converted into the text where analytics identify patterns in the recorded data. In this way, customer feedback like complaints, recommendations, suggestions, and other useful factors are collected easily, which are then applied to enhance the services and products of organizations.

Therefore, unsurprisingly, speech analytics has become one of the major reasons behind the resurgence of customer satisfaction and retention for many organizations. According to MarketsandMarket, by 2020, the speech analytics industry is estimated to balloon up to $1.60 billion.

Today, organizations harness speech analytics for raising the standards of their conversations, insights, and outcomes. If we examine through a historical outlook, then it was always the norm for organizations to comprehend and recognize the requirements of customers and adjust their offers accordingly.

For instance, Henry Ford got a breakthrough in the automotive industry when he divided the major issues at hand and went through their individual analysis. Then, he began implementing procedures that would supplement the efficiency of his organization. Ford’s approach was not too dissimilar to the modern-day analytics.

The Change in Mindset

Previously, call center agents were involved in repetitive outbound calls to their potential and actual clients. They received queries from inbound calls and the actual emphasis was on the length of the call. However, in this age, the emphasis has shifted towards customer engagement and overall experience. Organizations now understand that offering solutions to identified issues can help in fostering loyalty with customers and maximizing their own revenues.

Consider your surroundings to analyze accepted and normal behaviors. For instance, have you noticed how invested people have become lost in their smartphone screens? It is hard to imagine how days went by before the invention of the smartphone. Interpret the usage of IT and its impact on daily human interactions. Likewise, get a grip on the social media frenzy which has become the primary medium for communication.

Today, industries are actively pursuing speech analytics to boost their operations. The older voice solutions like IVR (Interactive Voice Recognition) have been shunned a long time ago. This is the speech analytics age where the technology is powerful enough to grasp the message of a customer and facilitate the management to respond with a workable and effective solution.

What Did Speech Analytics Do?

Speech analytics has triggered a revolution for call center agents through the following benefits.

Locating Customer Issues

The operational nature of call centers vary. However, standard practices are applied by all. It is important to understand that these practices may not be the best replacements. On the other hand, speech analytics ensures that a call center is able to mark the exact points from where customer grievances arise. Likewise, it can then guide agents to respond to those issues.

For instance, a customer purchases a winter jacket from an e-commerce website. After receiving the jacket, he might find its quality subpar or that the color does not match his order description. In response, the agitated customer calls for the cancellation of the order and demands a refund. Speech analytics can be used here to identify the common issues in these orders which can not only improve the service but also assist in adding a new feature in the product as a result, the churn cycle could be minimized to an extent.

Marketing

There is a strong relationship between the sales and marketing departments of organizations, and therefore they are interdependent. With speech analytics, marketing experts can take notes from the calls of sales agents which can assist them in “connecting” to their customers.

For instance, speech analytics pinpoints to the high pricing of a product as a major issue for a wide majority of customers who are primarily students. The marketing department can use this piece of information to promote an advertisement based on discounts for those students. Consequently, orders pour in and the marketing department scores an important victory.

The marketing department views speech analytics as a formidable tool which can provide it with the demographics of customers like their occupation, gender, age, location, etc. Hence, their marketing strategies are adjusted accordingly.

Training

One of the most productive uses of speech analytics is to allow supervisors and managers to train their calling agents. The performance of those agents is duly assessed by going through these calls. Proper analytics can also recognize if a particular agent requires further training or not. Likewise, it can serve as the basis of promotion for an agent whose output was not noticed before.

Minimizing the Churn Rate

The loss of clients is referred to as the customer churn. Customer churn is an extremely important factor for organizations, especially the SMEs. Presently, consumer habits are ever-changing which means that same product which generated positive results in 2017 may not generate the same results today. This is where speech analytics can be leveraged to identify the changing trends so businesses can comprehend and tailor their processes accordingly for better results.

Final Thoughts

The inception of speech analytics has disrupted the conventional call center industry. Businesses are using it to increase their revenues. If you do not use it in your operations, then do give a thought or two about integrating it in your business processes.

How Do Search Engines Work?


Search engines are used on a daily basis by people all over the world. Individuals living in both first world, as well as third world countries, frequently rely on search engines to answer all of their questions. Whether you’re looking for the nearest restaurant or a new product to buy, you’re likely to use Google, Bing, or another search engine for this purpose. Have you ever wondered how do search engines skim through tons of data to offer you the best possible results? Well, here’s a quick look at how search engines work.

Index

When a user types a search query, the search engine picks up the most relevant web page and sends it back to the user as a response. This web page has to be stored somewhere. To do this, search engines maintain a large index. The index assesses and arranges each website and its web pages so they can be linked with the phrases and words which are searched by users.

Additionally, the index has to put a specific rating for pages that are associated with a specific topic. To do this, they have to maintain a standard for quality so users can get the most relevant and useful content from search engines. For example, suppose a user searches “How to learn Java?” Such a topic is already discussed by different websites so how does the search engine know which pages to show to a user? To do this, search engines have designed their own criteria.

Crawlers

Website crawlers are programs that serve as the primary tool for search engines. They are responsible for recognizing the pages in the “Web.” Whenever a page is identified by a crawler, it is “crawled.” Crawl refers to the analysis of the page during which the crawler gathers and accumulates different types of data from the web page. It then adds the page in the index after which the hyperlinks of the page are utilized to go to other websites and the process is repeated. This process is similar to the life of a spider which weaves a web and crawls from one place to another easily. Hence, crawlers are also called as spiders. Web administrators can make their web pages more readily available to crawlers through two techniques.

  • Sitemap – A sitemap contains a hierarchical view of the complete website with topics and links which makes it easy for crawlers to navigate all the pages of a website.
  • Internal Links – Website administrators place hyperlinks in the web content which direct to the internal web pages across the entire website. When crawlers come across such links, they are able to crawl through them, thereby improving their efficiency.

Algorithms

One of the most important considerations for an index is to assign a relative rating to all the stored web pages. When a crawler finds 20,000 relevant web pages for a user query, then how is the search engine suppose to choose the ranking results?

In order to address these concerns, search engines like Google use an extensive list of algorithms. Examples are RankBrain and Hummingbird. Each search engine has a think-tank which initially decided on how to rank a web page. This understanding takes some months before a large algorithm is designed to rank websites.

How to Rank?

Search engines rank a website after considering multiple factors. Some of the common factors are the following.

Age

If there are two websites A and B with the same attributes other than the fact that A was designed earlier than B, then A holds greater importance for the search engines. Search engines favor older websites and see them as reliable and authentic.

Keywords

Perhaps the most important metric for search engines is to assess a keyword. When search engines look for the best results in terms of relevancy, they go through a list of words and phrases. These words are popularly known as keywords. The importance of keywords has to lead to the creation of a separate study known as keyword analysis.

Mobile Optimization

Search engines like Google have made it clear that if a website loads and works well on desktop PC then it is not enough. Nowadays mobiles and smart devices have swarmed the world. Wherever you go, everyone has a mobile in hand. Therefore, mobile optimization is necessary for search engines.

Links

External links remain as one of the most crucial metrics for search engines to rank a page. If your web page is linked by a credible and established website, then the worth of your page increases in the eyes of the search engines. It conveys them a message that your web page has informative and high-quality content that made others reference your website. The more external links a web page receives, the more quickly the website gains a boost in its online ranking.

Speed

How often have you opened a website, only to be annoyed by the slow loading speed? Factors like these also weigh on ranking. When crawlers visit a link and find slow loading, they record it and inform the search engine. Consequently, the search engines cut off your mark in ranking and your page will lose its online ranking. Likewise, search engines monitor the number of instances where a user enters your web page and immediately leaves it, thereby signaling the possibility of slow loading.

The Birth of a New Field

Brick-and-mortar businesses are a thing of the past. Today, every brand has gone digital to market and advertise their services. This has given rise to the creation of an in-demand field known as SEO (Search Engine Optimization). Since every website competes to rank well on search engines, mainly Google, website owners have to understand how search engines work. To do this, there are several SEO strategies which are formed on the basis of search engine metrics and allow businesses to rank high on search engines.

Introduction to Angular JavaScript


Over the past years, the demand for JavaScript development has touched unprecedented heights. JavaScript is being used in several front-end frameworks to incorporate modern functionalities and features in websites. AngularJS is among one of these frameworks. Like, traditional JavaScript, you can add AngularJS code to any HTML document by using the following tag.

AngularJS is a client-side JS MVC (model view controller) framework which is mainly used for the production of modern dynamic websites. The project was initially conceptualized by the tech giant Google, however, later it was made available for the global software community. The entire AngularJS syntax is based on JavaScript and HTML; therefore you do not have to learn any other language.

You can convert static HTML to dynamic HTML through the use of AngularJS. It helps to enrich the capabilities of HTML-based website through the addition of built-in components and attributes. To understand some basic concepts in AngularJS, read further.

Expressions

Expressions are used to bind data with HTML in AngularJS. These expressions are defined through double braces. On a similar note, you can also use the ng-bind=”expression” to define your expressions. When AngularJS counters an expression then it instantly works to execute it and sends back the result to the point from where it was called. Similar to the expressions in JavaScript, AngularJS has its own expressions which store operators, variables, and literals. For instance, consider the following example where an expression is displayed.

<!DOCTYPE html>

<html>

https://ajax.googleapis.com/ajax/libs/angularjs/1.6.9/angular.min.js

<body>

The calculation result is {{ 4 * 6 }}

</body>

</html>

Modules

Modules in AngularJS are used to specify the type of application. It is essentially a container which holds several application components like controllers. To create a module, you simply have to use the angular. module method.

var e1 = angular.module(“example1”, []);

Here “example1” is used for referencing an HTML element which is used to run the application. After defining your module, you can add other Angular JS elements like directives, filters, and controllers.

Directives

To modify HTML elements, you can use directives in AngularJS. You can either used built-in directives to add any functionality or specify your own directive to add behavior. Directives are distinct due to the fact that they begin with a special prefix, ng-.

  • You can use the ng-app directive to initialize an application in the AngularJS.
  • You can use the ng-init directive to initialize an application data in the AngularJS.
  • You can use the ng-model directive to bind values from HTML controls and connect them with the application data.

For example, consider the following example.

<!DOCTYPE html>

<html>

https://ajax.googleapis.com/ajax/libs/angularjs/1.6.9/angular.min.js

<body>

Type anything in the textbox.

User Name:

You typed: {{ userName }}

</body>

</html>

In this example, the ng-app first relays to the AngularJS that the

is the application’s owner. Then the ng-init initializes the application data .i.e. the username, and lastly the ng-model binds the username to the HTML paragraph tag. Therefore, you can observe real time change by typing in the textbox, something which was not possible with HTML alone.

You can use the “.directive” function to create your own directives. To generate a new directive, use the same tag name for your directive which is used by your HTML element. Consider the following example.

https://ajax.googleapis.com/ajax/libs/angularjs/1.6.9/angular.min.js

var a = angular.module(“example1”, []);

a.directive(“newdirective”, function() {

return {

template : “

This text is created through a user-defined directive!

};

});

Model

As explained before, the ng-model directive is used to bind HTML controls. Consider the following example,

https://ajax.googleapis.com/ajax/libs/angularjs/1.6.9/angular.min.js

Name of the Employee:

var a = angular.module(‘Example1’, []);

a.controller(‘first’, function($scope) {

$scope.empname = “Jesse James”;

});


</body>

</html>

Here, the controller was used to create a property after which the ng-model was used for data binding.  Similarly, you can use it to validate user input.  For example, consider the following code. Whenever a user types irrelevant information, an error messages appears.

<!DOCTYPE html>

<html>

https://ajax.googleapis.com/ajax/libs/angularjs/1.6.9/angular.min.js

<body>

<form ng-app=”” name=”login”>

Email Address:

<input type=”email” name=”emailAddress” ng-model=”text”>

<span ng-show=”login.emailAddress.$error.email”>This is an invalid email address</span>

</form>

</body>

</html>

Data Binding

In Angular JS, the synchronization between the view and model is referred to as data binding. In general terms, you can think of data binding as a procedure through which a user can dynamically change the elements of a web page.

A standard application in AngularJS consists of a data model which stores the complete data of that specific application.

By view, we mean the HTML container in which we have defined our AngularJS application. Afterward, an access is configured to the model for the view. For data binding, you can also use the ng-bind directive. This directive applies binding on an element’s innerHTML and the defined property for the model. For example,

<!DOCTYPE html>

<html>

https://ajax.googleapis.com/ajax/libs/angularjs/1.6.9/angular.min.js

<body>

Student Name: {{studentname}}

var ajs = angular.module(‘angjs1’, []);

ajs.controller(‘firstController’, function($scope) {

$scope.studentname = “Matthew”;

});

</body>

</html>

Note, that double braces are used in HTML elements to show the stored data from any model.

Controller

Controllers form the backbone of AngularJS applications and contain the business or central logic of the application. Since, AngularJS synchronizes the view and the model via data binding; therefore the controller needs to only focus on data on the model. An example, of controller is the following.

<!DOCTYPE html>

<html>

https://ajax.googleapis.com/ajax/libs/angularjs/1.6.9/angular.min.js

<body>

{{name}}

var a = angular.module(‘app1’, []);

a.controller(‘first’, function($scope) {

$scope.name = “Larry”;

$scope.modifyname = function() {

$scope.name = “David”;

}

});


</body>

</html>

When you click on the heading, then the controller dynamically changes the content of the element.

Data Management Patterns for Microservices Architecture


Data is the primary requirement of any software. Thus, efficient and effective data management can make or break a business. For starters, you have to ensure that data is available to the end user at the right time. Monolithic systems are notorious for their complex handling of data management. In contrast, microservices architecture paints a different picture. Here are some of data management patterns for this type of architecture.

Database Per Service

In this model, data is managed separately by each microservice. This means that one microservice cannot access or use the data of another one directly. In order to exchange data or communicate with each other, a number of well-designed APIs are required by the microservices.

However, the pattern is one of the trickiest to implement. Applications are not always properly demarcated. Microservices require a continuous exchange of data to apply the logic. As a result, spaghetti-like interactions develop with different application services.

The pattern’s success is reliant on carefully specifying the application’s bounded content. While this is easier in newer applications, large systems present a major problem at hand.

Among the challenges of the pattern, one is to implement queries that can result in the exposure of data for various bounded contexts. Other options include the implementation of business transactions that cover multiple microservices.

When this pattern is applied correctly, the notable benefit of it includes loose coupling for microservices. In this way, your application can be saved from the impact-analysis-hell. Moreover, it helps in the individual scaling up of microservices. It is flexible for software architects to select a certain DB solution while working with a specific service.

Shared Database

When the complexity of database per service is too high, then a shared database can be a good option. A shared database is used to resolve similar issues while using a more relaxed approached as a single database receives access by several microservices. Usually, this pattern is considered safe for developers because they can make use of existing techniques. Conversely, doing such always restricts them from using microservices at its best. Software architects from separate teams require cooperation to modify the schema of tables. It is possible that the runtime conflicts occur in case two or more services attempt using a single database resource.

API Composition

In a microservices architecture, while working with the implementation of complex queries, API composition can be one of the best solutions. It helps in the invocation of microservices for the needed arrangement. When results are fetched, a join (in-memory) is executed of the data after which the consumer receives it. The pattern’s drawback is its utilization of in-memory joins—particularly when they are unnecessary—for bigger datasets.

Command Query Responsibility Segregation

Command Query Responsibility Segregation (CQRS) becomes useful while dealing with the API composition’s issues.

In this pattern, the domain events of microservices are ‘listened’ by an application which then updates the query or view database accordingly. Such a database can allow you to handle those aggregation queries which are deemed complex. It is also possible to go with the performance optimization and go for the scaling up of the query microservices.

On the flipside, this pattern is known for adding more complexity. Suddenly it forces that all the events should be managed by the microservice. As a consequence, it is prone to get latency issues as the view DB exercises consistency in the end. The duplication of code increases in this pattern.

Event Sourcing

Event sourcing is used in order to update the DB and publish an event atomically. In this pattern, the entity’s state or the entity’s aggregate in the form of events—where states continue to change—are stored. Insert and update operations cause the generation of a new event. Events are stored in the event store.

This pattern can be used in tandem with the command query responsibility segregation. Such a combination can help you fix issues related to the maintenance of data and event handling. On the other hand, it has a shortcoming as well; the imposition of an unconventional programming style. Moreover, eventually, the data is consistent, not always the best factor for all the applications.

Saga

When business transactions extend over several microservices, then the saga pattern is one of the best data management patterns in a microservices architecture. A saga can be seen as simply local transactions—in a sequence or order. When Saga is used to perform a transaction, an event is published by its service. Consequently, other transactions follow after being invoked due to the prior transaction’s output. In case, failure arises for any of the chain’s transactions, a number of transactions (as compensation) are executed by the Saga to repair the previous transactions’ effect.

In order to see how Saga works, let’s consider an instance. Consider an app which is used for food delivery. If a customer requests for an order of food, then the following steps happen.

  1. The service of ‘orders’ generates an order. In this specific time period, a pending state marks the order. The events chain is managed by a saga.
  2. The service of ‘restaurant’ is contacted by the saga.
  3. The service of ‘restaurant’ begins the process to start the order for the selected eatery. When the eatery confirms, a response is generated and sent back.
  4. The response is received by the Saga. Considering the response contents, it can either proceed with the approval or rejection of the order.
  5. The service of ‘orders’ modifies the order state accordingly. In the scenario of the order approval, the customer receives the relevant details. In the scenario of order rejection, the customer receives the bad news in the form of an apology.

By now, you might have realized that such an approach is too distinct from the point-to-point strategy. While this pattern may add complexity, it is a highly formidable solution to respond to several tricky issues. Though, it is best to use it occasionally.

Are Microservices the Right Fit For You?


The term Microservices was originally coined in 2011. Since then it has been on the radars of modern development organizations.  In the following years, software architecture has gained traction in various IT circles. According to a survey, the enterprises which used microservices were around 36 percent while 26 percent were thinking to include it in the future.

So, why exactly should you use microservices your company? There has to be something unique and more rewarding in it that can compel you to leave your traditional architecture in favor of it. Consider the following reasons to decide for yourself.

Enhance Resilience

Microservices can help to decouple and decentralize your complete application into multiple services. These services are distinct because they operate independently and are separate from each other. As opposed to the conventional monolithic architecture in which code failure can disrupt one function or service, there are little to no possibilities a single service failure to affect another. Moreover, even if you have to do maintain code for multiple systems, it will not be noted by your users.

More Scalability

In a monolithic architecture, when developers have to scale a single function, they have to tweak and adjust other functions as well. Perhaps, one of the biggest advantages of microservices is the scalability which it brings to the table. Since all the services in microservices architecture are separate, therefore it is possible to scale one service or function without having to worry about scaling up the complete application. You can deploy critical business services on different servers to improve the performance and availability of your application whereas your other services remain unaffected.

Right Tool for the Right Task

Microservices ensure that a single vendor does not make you pigeonholed. It can help you to infuse greater flexibility for your projects so rather than trying to make things work with a single tool, you can instead look up for the right tool which can fit your requirements. Each of your services can use any framework, programming language, technology stack, or ancillary services. Despite this heterogeneousness, they can still communicate and connect easily.

Promotion of Services

In microservices, there is no need to rewrite and adjust the complete codebase if you have to change or incorporate a new feature in your application. This is because microservices are ‘loosely coupled’. Therefore, you only have to modify a single service if it is required. The strategy to code your project in smaller increments can help you to test and deploy them independently. In this way, you can promote your services and application quickly, as soon as you complete one service after another.

Maintenance and Debugging

Microservices can help you to test and debug applications easily. The use of smaller modules via continuously testing and delivery means that you can create applications from bugs and errors, thereby improving the reliability and quality of your projects.

Better ROI

With microservices, your resource optimization is instantly improved. They allow different teams to operate by using independent services. As a result, the time needed to deploy is reduced. Moreover, the time for development is also significantly decreased while you can achieve greater reusability as well for your project. The decoupling of services also means that you do not have to spend much on high-priced machines. You can use the standard x86 machines as well. The efficiency which you get from microservices can minimize the costs of infrastructure along with the downtime.

Continuous Delivery

While working with a monolithic architecture, dedicated teams are needed to code discrete modules like front-end, back-end, database, and other parts of the application. On the other hand, microservices allow project managers to add cross-functional teams in the mix who can manage the application lifecycle through a delivery model which is entirely continuous in nature. When testing, operations, and development teams use a single service at the same time, debugging and testing is quickened and made easier. This strategy can help you to develop, test, and deploy your code ‘continuously’. Moreover, you do not have to write new code, instead, you can write code with the help of the existing libraries.

Considerations before Deciding to Use Microservices

If you have decided to use a microservices-based architecture, then review the following considerations.

The State of Your Business

To begin with, you have to think if your business is big enough that it warrants your IT team to work on complex projects independently. If you are not, then it is better to avoid microservices.

Assess the Deployment of Components

Analyze the components and functions of your software. If there are two or more components which you deploy in your project which are completely separate from each other in terms of business processes and capabilities, then it is a wise option to use microservices.

Decide if Your Team Is Skilled for the Project

The use of microservices allows project managers to use smaller teams for development that are well-skilled in their respective expertise. As a result, it helps to quickly generate new functionalities and release it.

Before you adopt the microservices architecture, you have to make sure that your team members are well positioned to operate with continuous integration and deployment. Similarly, you have to see if they can work in a DevOps culture and are experienced enough to work with microservices. In case, they are not good enough yet, you can focus on creating a group who is able to fulfill your requirements to work with microservices architecture. Alternatively, you can also hire experienced individuals to make up a new team.

Define Realistic Roadmap

Exponential scaling is the key to success. Despite the importance of businesses to be agile, it is not necessary for all businesses to scale. If you feel that complexity cannot help you much, then it is better to avoid a microservices architecture. You have to decide on some realistic goals about how your business is going to operate in the future to decide if the adoption of microservices architecture can reap your benefits.

Evolution of Event-Driven Architecture


As I explained in my previous post (here and here) Event Driven Architecture is key to digital transformation. here I will be talking about how it evolved.

Nowadays, the trend in event-driven architectures is one in which messaging is complex and quite different from a basic pipe which establishes connections between systems. Today, event-driven architectures combine elements from distributed database systems and streaming systems through where users can join, aggregate, modify and store data. The modern day implementations of these practices have been classified into four general patterns.

1.   Global Event Streaming Platform

This pattern bears similarity to the traditional enterprise messaging architectures. By using this event-driven approach, a company uses core datasets. These datasets share data from application modules like customers, payments, accounts, orders, and trades while an event streaming platform (for .e.g. Apache Kafka) is used.

This approach is a replacement for point-to-point communication technologies which are used in legacy systems. In such systems, applications are connected over multiple separate locations in real time.

For example, a business which runs a legacy system in New York can also operate through international branches in Stockholm and Berlin while connected through microservices with Amazon Web Services, all at the back of the same event-driven approach. A more complex use can include the connection of various shops across regional waters.

Some renowned companies who have adopted this approach include Audi, Netflix, Salesforce, ING, and others.

2.   Central Event Store

Events can be cached by streaming platforms for a specific or undefined time period to generate an event store, a type of organizational ledger.

This approach is used by companies for retrospective analysis. For instance, it can be used to train models in ML (machine learning) for detecting frauds of an e-commerce website.

This approach facilitates developers to create new applications without needing the republishing of previous events by the source systems. As a result, it becomes easier to replay datasets from their actual source which can be a legacy, external, or mainframe system.

Some companies store their complete data in Apache Kafka. This approach comes under event sourcing, forward event cache, or event streaming.

Event storage is necessary for stream processing with states to generate self-sufficient and enriched events through several distinct data sources. For example, it can be used to enrich orders from a customer module.

FaaS implementations or microservices are easily able to consume enriched events as these events carry all the required data for the service. Additionally, they are also used for the provision of a database’s denormalized input. These enrichments are executed by stream processors which require event storage to store data which works with tabular operations.

3.   Event-First and Event Streaming Applications

Usually, in conventional setups, applications gather data from several locations and import datasets in the database after which it can be filtered, joined, aggregated, and cleaned. This is a particularly effective strategy for applications which require creating dashboards, reports or operate via online services. However, in business processing, efficiency can be attained by ignoring the DB step and instead of sending real-time events into a serverless function or microservices.

For such approaches, stream processors like KSQL and Kafka Streams execute the operations like joining, filtering, and aggregating event streams to manipulate data.

For instance, suppose there is a service for limit checking which joins payments and orders through KSQL or a similar stream processing. It extracts the required fields and records and then sends it to a FaaS (function as a service) or a microservice where a check is executed for the limit while no DB is used.

This event-driven approach offers a greater degree of responsiveness to systems because they can be quickly and conveniently built due to the lesser data and infrastructural requirements.

4.   Automated Data Provisioning

This approach mixes the above-mentioned practices while combining serverless/PaaS implementations with the aim of making data provisioning as self-service.

In automate data provisioning, a user specifies the type of data which they require including its form or where it should land like a microservice, FaaS, database, or a distributed cache.

The infrastructure is provisioned by the system which also pre-populates it accordingly and supervises the flow of events. The buffering and manipulation of data streams is done by stream processing. What this means is that for instance, a retail business may have to join payments, customer, and real-time orders after which they send it into a FaaS or a microservice.

The migration of businesses to both private and public clouds has overseen an adoption of this pattern. It helps to initiate new project environments. Since datasets are stored or cached in the messaging system; therefore users only have to use data which they require at a specific time. Meanwhile, earlier in traditional messaging, it was a common practice to hoard and consume complete datasets so they can be used later.


Shedding Light on the Evolution

Over the last few years, there has been considerable evolution in event-driven architectures. In the beginning, they were only used to pass messages—use of state transfer and notification for standard messaging systems.

Afterward, these architectures were enhanced with the help of improved centralized control and better out-of-the-box connectivity. However, centralized control was a tricky part; due to standardization, teams found it difficult to progress. In recent memory, storage patterns like CQRS and event sourcing have gained popularity. The above-mentioned approaches are based on it.

Nowadays modern event streaming systems have taken the next step to unify storage, processing, and events into the same platform. This amalgamation is necessary as it shows that these systems are different from databases which store data in one place. Moreover, they do not even fall into the category of messaging systems in which data is transitory. Thus, they are a combination of both databases and messaging systems.

The correct use of these standard categories has allowed organizations to target several regions and clouds for global connectivity and data has become one of their most prized commodities used in provisioned as a service. This means that it can be pushed into a cache, database, machine learning model, serverless function, or a microservice.


Fundamentals to Create a Scalable Cloud Application


Developing cloud-based applications needs a modern mindset along with the implementation of newer rules. When the cloud is used effectively, it can help both small and large enterprises with a wide range of activities. Consider the following factors to create a scalable cloud application.

Reflecting on the Topology

One of the leading reasons behind the use of cloud systems is that it helps businesses scale their applications at will. Often, virtual applications are implemented to attain this type of scaling.

Instead of limiting yourself to a certain topology, you should consider how to protect your cloud applications from the dynamic scaling impact. If you can design a generic application, you can prevent your application from struggling with negative effects during the cloud migration. In case your application is using a singleton state, developing a backup through a shared repository can assist you before the cloud migration.

Pondering Over Design

Designing the appropriate scalable cloud architecture which also aligns well for business risk requires the right combination of security policies and design principles. For a cloud system, you should have the tools for designing, implementing, and refining your policies for enforcement, and controls in a centralized approach.

These tools allow developers to equip the network layer with security through solutions like host-level firewalls, VPNs, access management, and security group. For the operating system layer, they can take advantage of strict privilege separation, encryption storage, and hardened system. While dealing with the application layer, they can benefit from carefully enforced rules and the latest updates. The idea is to implement these solutions in conjunction for the design and development approach, instead of thinking it as being part of operational maintenance.

In the cloud, when you deploy services, it gives you an edge to plan your network and security solutions from scratch.


Sharding and Segmenting

You have to ensure that you have properly separated concerns regarding your components. For instance, while working with an RDBMS, a common question is that where should the developer place the DB? According to a conventional approach, the DB server has to a large metallic structure with 16TB RAM and a 64-CPU box.

However, a large and singular DB server for hosting is significantly less powerful in comparison to multiple small DB servers where each of them hosts one schema. This means that if you have a 16 CPU, 16 GB server, then you are better off with 2 CPU, 2GB PostgreSQL servers to achieve greater performance. Similarly, you also have the choice to vertically scale all your instances by adding one schema for each server. In this way, you can have additional RAM, CPUs, and can also perform migration for better storage to use that schema.

This recommendation is equally effective for in-house IT teams. For instance, if all the organization’s department wants to use a portal—let’s say it is built on Drupal—then all departments have to manage documents themselves. Therefore, the use of a stand-alone server is an effective option. All your instances can be maintained with a similar strategy; they will be connected to a primary authentication server while scaling will be performed independently.

Choosing Enterprise Integration Patterns

While designing cloud applications, choosing the right design patterns is necessary. Enterprise integration patterns are a good fit for service-oriented architectures. You can use enterprise integration patterns which have gained relevance for enterprise-level systems. It helps to scale cloud systems on demand while incorporating an extensive list of third-party tools.

The use of development which is based on patterns helps developers and architects to code applications which are convenient to connect, describe, and maintain through utilizing recurrent elements.

In cloud systems, patterns are particularly used for routing messages. Sometimes in service-oriented architectures, a common pattern known as message translator is required where the adoption of shared best practices is effective.

Similarly, there are options like Apache Camel which developers use to get their hands on the enterprise integration framework. It allows them to avoid writing glue code. Instead, they can focus on coding business logic, thanks to the reusable integration patterns of Camel.

Enhancing QoS

At times, a strong wave of traffic comes at once where systems are simply struggling to manage the workload.  If a service is non-operational in these times, then it can be quite tricky to handle a large number of messages which must be processed. These are times when the inbound traffic is more than the limits of the system and it is not possible to create a response for all requests.

You may think about the shutdown as a solution but there are better options. If you can enforce QoS (quality of service) to produce and consume your messages, it is possible to achieve diminished availability rather than going completely unavailable.

To stop services from getting overloaded, you can decrease the message number which is being managed; specify a time-to-live for them. By doing this, messages which are older and not relevant can expire and thus discard after a time limit.  You can also try restricting the message number which is interpreted simultaneously through the use of concurrent message consumption; restrict each service to handle no more than 10 messages at a single time.

Going Stateless

For scalable cloud applications, the maintenance of a state is always tough. Persistence is another name for maintenance of state. Persistence is to store data in a location that is central, due to which it is always hard to scale in such instances. Instead of using multiple transactional or stateful endpoints for your cloud application, you can ensure that your application possesses a RESTful capability; however, make sure that it is not restricted by HTTP.

If you must use state and you cannot ignore state for your cloud applications, then you can govern your state through the use of the above-mentioned enterprise integration patterns. For instance, read about the claim check pattern.

How to Increase the Availability of an Application with RabbitMQ?


If you have used RabbitMQ for managing the messaging part of your applications, then you are certainly aware of the configuration issues which are recurrent with it. Software engineering experts who have used RabbitMQ for an extended period of time know that it can face certain configuration errors.

Therefore, it is necessary to configure it correctly. In this way, you can achieve the best possible performance along with getting the cluster which is the most stable of them all. This article focuses on a number of tips and techniques which can improve the availability and uptime of your application.

Limit Queue Size

The arrangement of queues matters in the RabbitMQ environment. If you wish to attain maximum performance for your application then ensure that these queues remain shorter in size. When a queue is considerably large in size, then the accompanied processing overhead slows down the performance of the application. In order to achieve optimal performance for your application, queues should remain close to 0.

Turn On Lazy Queues

Since RabbitMQ 3.6, there is an option in the messaging platform to use lazy queues. In lazy queues, messages are automatically redirected to the secondary memory of your disk and are then stored there. When the need arises for a message, then the main memory calls out the corresponding message from the disk. Since all the messages are stored on the disk, therefore it helps to manage and optimize the usage of RAM. On the other hand, it also promises additional time for the throughput.

The use of lazy queues ensures you can produce improved stable clusters. These cluster features are known to infuse a certain degree of predictability in the performance. As a result, the server’s availability gets a much-needed boost. If your application involves too much processing of batch jobs and deals with a high number of messages, then you might be concerned that the speed of publisher may not always be kept up by the consumers. In this case, you must give a thought to turn off the lazy queues.

Manage Cluster Setup

The node collection in RabbitMQ is also known as a cluster. In order to improve availability, make sure that the clients are facilitated with data replication in the event of any possible or expected failure. This means that even if a cluster is disconnected, clients could access it to fulfill their requirements.

In Cloud AMQP, you can create 3 clusters. You have to locate all nodes for various availability zones (AWS) while queues should be replicated (HA) amongst the availability zones.

If a node goes down, then there should be a mechanism which can transfer processing to the remaining cluster nodes for keeping up the availability of the application. To do this, you can use a load balancer with the instances of the RabbitMQ. The load balancer can help with the message publishers for transparent brokers distribution.

Keep in mind that in Cloud AMPQ, 60 seconds is the max failover time. The DNS TTL runs every 30 seconds while the endpoint health is processed after every 30 seconds.

By default, message queues are positioned on a single node. However, they can be reached and seen by all the other nodes. For replication of queues in the node cluster, you can visit this link to achieve high availability. If you need more information on the configuration of nodes in your cluster, then you can visit this link.

Using Durable Queues and Persistent Messages

If it is absolutely critical that your application cannot lose a message, then you can configure your queues as “durable”. In this way, your sent messages are now delivered with a “persistent” mode. If you wish to prevent the loss of messages with the broker, then you have to consider broker crashes, broker hardware failure, and broker restart issues. In order to make sure that the broker definitions and messages are not hampered by restarts, you can store them on the disk. Queues, exchanges, and messages which are not declared as persistent and durable are missed if the broker restarts.

Using the Federation for the Cloud

According to some experts, clustering between regions or cloud is not recommended. This means you do not have to think about the distribution of nodes across data centers or regions. In case, an entire cloud region is disconnected, the impact can force the CloudAMQP to falter as well, though it not necessary that it will be affected. The nodes in the cluster are distributed among availability zones in the same region.

If you wish to safeguard the setup when a complete region goes down, then you can configure two clusters for separate regions and apply “federation” between them. Federation is a plugin in RabbitMQ. The use of the federation plugin allows your application to leverage more than one broker which are spread across separate systems.

Turn Off HiPE

If you plan to use HiPE, then avoid it. When HiPE is used, the server throughput is noticeably increased but it also increases the startup time. If HiPE is turned on, then the compilation of RabbitMQ is triggered at the startup. This also means that the startup time can increase to as much as 3 minutes. As a consequence, you might face issues during a server restart.

Disable Detailed Mode

If you have set the RabbitMQ Management statistics rate mode as “detailed, disable it immediately. When this mode is enabled, it can affect the performance and availability of the application. As such, it should not be utilized in production.

Limit Priority Queues

All the priority levels work on the Erlang VM with an internal queue. This queue consumes the considerable resource. For general use, you may not need more than 5 priority levels.

What Are the Components of a Sharded Cluster in MongoDB?


A sharded cluster in MongoDB is composed of 3 elements: shards, config servers, and mongos. These are the following.

Shards

Data from a sharded cluster is encompassed in a subset which is stored in a shard. All shards grouped together to maintain the data of the entire cluster. For deployment, you have to configure a shard as a replica set in order to achieve high availability and redundancy. Shards are used for maintenance and administrative operations.

Primary Shard

All the databases have their own primary shard. Primary shards reside in a sharded cluster’s database. They store all of those collections which are not sharded. Bear in mind, that there is no link between the primary shard and the primary replica member of the replica set, hence do not be confused by the similarity in their names.

A primary shard is chosen by the mongos during the generation of a new database. To choose a shard, mongos picks the one which contains minimum data.

It is possible to change the primary shard via a command, “movePrimary”. However, do not change your primary member so casually. The change of a primary shard is a time-consuming procedure. During the primary shard migration, you cannot use collections of that shard’s database. Likewise, cluster operations can be disrupted, and the extent of this disturbance is reliant on the data which is currently migrating.

To check a general view of the cluster in terms of sharding, you can use the sh.status method via the mongo shell. The results generated by this method also specify the primary shard of the database. Other useful information includes information about how the chunks are distributed among the shards.

Config Servers

The sharded cluster’s metadata is stored in the config servers. This metadata can include the organization of the components in the cluster along with the states of these components and data. Information about all the shards and their chunks are maintained in the config servers.

This type of data is then used for caching by the mongos instances after which it is used for routing associated with read and writes operations with respect to the appropriate shards. When new metadata is updated, then the cache is also updated by the mongos.

It must be noted that the configuration of “authentication” in MongoDB like internal authentication and RBAC (role-based access control) is also stored in these config servers. Additionally, MongoDB utilizes them for the management of distributed locks.

While it is possible for a single config server to be used with all the sharded clusters, such practice is not recommended. If you have multiple sharded clusters, then use a separate config server for all of them.

Config Servers and Read/Write Operations

Write Operations

If you are a MongoDB user, then you must be familiar with the admin and config databases in MongoDB. Both of these databases are maintained in the config servers. Collections associated with the authorization, authentication, and system collections are stored by the “admin” database. On the other hand, the metadata of the sharded cluster is stored in the “config” database.

When the metadata is modified like when a chunk is split or a chunk is migrated, then MongoDB directs write operations on the config DB. During these write operations, MongoDB uses “majority” for the write concern.

However, as a developer, you should refrain from writing to the config DB by yourself in the midst of maintenance or standard operations.

Read Operations

The admin database is used for read operations by the MongoDB. These reads are associated with authorization, authentication, and internal operations.

If the metadata is modified like when a chunk is being migrated or mongos is initiated, then read operations are processed to the config database by the MongoDB. MongoDB uses the “majority” read concern during these read operations. Moreover, it is not only the MongoB which reads from config servers. Shards also require them for read operations associated with the metadata of the chunks.

Mongos

The mongos instances in MongoDB are responsible for shard related write operations while they are also utilized for the routing of queries. For the sharded cluster, mongos is the only available interface which offers the application perspective. Keep this in mind that there is no direct communication between the shards and applications.

Mongos monitors the contents of a shard via metadata caching with the help of the config servers. The metadata provided by the config servers is then used by the MongoDB for routing operations between clients and applications with the instances of the mongod. Mongos instances lack a persistent state. This is helpful because it assists in the lowest possible consumption of the available resources.

Usually, mongos instances are run on a system which also houses the applications servers. However, if your situation demands, then you can also use them on any other dedicated resources like shards.

Routing and Results

While routing a query for a cluster, a mongos instance assesses all the shards through a list and identifies which shard needs the query. It then forms a cursor for all of these specific shards.

Afterward, the data in these shards is merged by the mongos instance which is then displayed in the result document. There are some modifiers for queries like sorting which maybe required to be executed on a shard. Subsequently, the retrieval of the results is carried out by the mongos. To manage the query modifiers, mongos does the following.

  • In the case of un-sorted query results, mongos applies a “round-robin” strategy for the generation of results from the shards.
  • In the scenario in which the result size is restricted because of the limit() method, then shards receive this information from the mongos. Afterward, they re-implement limit on the result and then send it to the client.

If the skip() method is used in the query, then like the previous case, it is not possible for mongos to forward the information. Instead, it searches the shards and fetches the unskipped results after which the specified skip limit is processed during the arrangement of the entire result.

What Are Replica Set Members in MongoDB?


Among the several database concepts out there, one of the most important ones is replication. Replication involves data copying between multiple systems so each user has the same type of information. This allows for data availability which in turn improves the performance of the application. Likewise, it can also help in backups, for instance when one of the systems is damaged by a cyberattack. In MongoDB, replication is achieved with the help of grouped mongod processes known as a replica set.

What Is a Replica Set?

A replica set is an amalgamation of multiple mongod processes which are combined together. They are the key to offering redundancy in MongoDB along with ensuring strong availability of data. Members in the replica set are classified into three categories.

  1. Primary member.
  2. Secondary member.
  3. Arbiter.

Primary Member

There can only be one primary member in a single replica set. It is a sort of “leader” among all the other members. The major difference between a primary member and other members is that a primary member gets write operations. This means that when MongoDB has to process writes, then it forwards them to the primary member. These writes are then recorded in the operation log (oplog) of the primary member. Afterward, the secondary members look up in the oplog and use that recorded data to implement changes in their stored data.

In the case of read operations, all the members of the replica set can process them but the read operation is first directed to the primary member due to default settings in the MongoDB.

All members in a replica set acknowledge their availability through a “heartbeat”. If the heartbeat is missing for the specified time limit (usually defined in seconds), then it means that the member is disconnected. In replica sets, there are some cases when the primary member gets unavailable due to multiple issues, for instance, the data center in which the primary member resides is disconnected due to the power outage.

Since replication cannot operate without a primary member, an “election” is held to appoint a primary member from the secondary members.

Secondary Member

A secondary member is dependent on the primary member to maintain its data. For replication, it uses the oplog of the primary member asynchronously. Unlike primary members, a replica set can have multiple secondary members—the more the merrier. However, as explained before, write operations are only conducted by the primary member and thus, a secondary member is not allowed to process them.

If a secondary member is allowed to vote, then it is eligible to trigger an election and take part as a candidate to become the new primary member.

A secondary member can also be customized to achieve the following.

  • Made ineligible to become the primary member. This is done so it can be utilized in a secondary data center where it is valuable as a standby option.
  • Block the contact of applications from the secondary member such that they cannot “read” through it. This can ensure that they work with special applications which necessitate detachment from the standard traffic.
  • You can modify a secondary member to act as a snapshot for historical purposes. This is a backup strategy which can aid as a contingency plan. For example, when a user deletes a database by mistake, then the snapshot can be utilized.

Arbiter

An arbiter is distinct due to the fact that it does not store its own data copy. Likewise, it is ineligible for the primary member position. So, why exactly are they used? Arbiters provide efficiency in the elections; they can vote once. They are added so they can vote and break the possibility of scenarios where it is a “tie” between members.

For example, there are 5 members in a replica set. If the primary member gets unavailable, then an election is held where two of the secondary members bag two votes each, so it is not possible for either of them to become the primary member. Therefore, to break such standoffs, arbiters are added so their vote can complete the election and select a primary member.

It is also possible to add a secondary member in the replica set to improve the election but a new secondary member is heavy as it stores and maintains data. Since arbiters are not constrained by such overheads; therefore they are the most cost-effective solution.

It is recommended, that arbiters should never reside in sites which are responsible to host both the primary and secondary members.

If the configuration option, authorization, is enabled in the arbiter, then it can also swap credentials with members of the replica set where authentication is implemented using the “keyfiles”. In such scenarios, MongoDB applies encryption on the entire authentication procedure.

The use of cryptographic techniques ensures that this authentication is secure from any exploitation. However, since arbiters are unable to store or maintain data, this means that the internal table—which has information of users/roles in authentication—can not be owned by the arbiters. Therefore, the localhost exception is used with the arbiter for authentication purposes.

Do note that in the recent MongoDB versions (from MongoDB 3.6 onwards), if you upgrade the replica set from an older version, then its priority value is changed from 1 to 0.

What Is the Ideal Replica Set?

There is a limit on the number of members in the replica set. At most, a replica set can contain 50 members. However, the number of voting members must not cross the 7-member limit. To configure voting and allow a member to vote, the members[n]. votes setting of a replica set must be 1.

Ideally, a replica set should have at least three members which can bear data: 1 primary member and 2 secondary members. It is also possible to use a three-member replica set where with one primary, secondary, and arbiter but at the expense of redundancy.

How to Work with Data Modeling in MongoDB with an example


Were you assigned to work on the MEAN Stack? Did your organization choose MongoDB for data storage? As a beginner in MongoDB, it is important to familiarize yourself with data modeling in MongoDB.

One of the major considerations for data modeling in MongoDB is to assess the DB engine’s performance, balance the requirements of the application, and think about the retrieval patterns. As a beginner in MongoDB, think about how your application works with queries and updates and processes data.

MongoDB Schema

The schema of MongoDB’s NoSQL is considerably different from the relational and SQL databases. In the latter, you have to design and specify the schema of a table before you can begin with the insert operations to populate the table. There is no such thing in MongoDB.

The collections used by MongoDB operate on a different strategy which means that it is not necessary that two documents (similar to rows in SQL databases) can have the same schema. As a result, it is not mandatory for a document in a collection to adhere to the same data types and fields.

If you must create fields in the document or you have to modify the current fields, then you have to update a new structure for the document.

How to Improve Data Modeling

During data modeling in MongoDB, you must analyze your data and queries and consider the following tips.

Capped Collections

Think about how your application is going to take advantage of the database. For instance, if your application is going to use too many insert operations, then you can benefit from the use of capped collections.

Manage Growing Documents

Write operations increase data exponentially like when an array is updated with new fields, the data increases quickly. It can be a good practice to keep a track of the growth of your documents for data modeling.

Assessing Atomicity

On the document level, the operations in MongoDB are strictly atomic. A single write operation can only change the contents of a single document. There are some write operations that can modify multiple documents, but behind the scenes, they only process one document at a time. Therefore, you have to ensure that you are able to factor in accurate atomic dependency according to your requirements.

The use of embedded data models is often recommended to utilize atomic operations. If you use references, then your application is forced in working with different read/write operations.

When to Use Sharding?

Sharding is an excellent option for horizontal scaling. It can be advantageous when you have to deploy datasets in a large amount of data and where there is a major need for read and write operations. Sharding helps in categorizing database collections. This helps in the efficient utilization for the documents of the collection.

To manage and distribute data in MongoDB, you are required to create a shared key. Shard key has to be carefully selected or it may have an adverse impact on the application’s performance. Likewise, the right shard key can be used to prevent a query’s isolation. Other advantages include a notable uplift in the write capacity. It is imperative that you take your time to select a field for the position of shard key.

When to Use Indexes?

The first option to improve the query performance in MongoDB is an index. To consider the use of an index, go through all your queries. Look for those fields which are repeated the most often. Make a list of these queries and use them for your indexes. As a result, you can begin to notice a considerable improvement in the performance of your queries. Bear in mind, that indexes consume space both in the RAM and hard disk. Hence, you have to keep these factors in mind while creating indexes or your strategy can backfire instead.

Limit the Number of Collections

Sometimes, it is necessary to use different collections based on application requirements. However, at times, you may have used two collections when it may have been possible to do your work through a single one. Since each collection comes with its own overhead, hence you cannot overuse them.

Optimize Small Document in Collections

In case, you have single or multiple collections where you can notice a large number of small documents, then you can achieve a greater degree of performance by using the embedded data model. To increase a small document into a larger one via roll-up, you can try to see if it is possible to design a logical relationship between them during grouping.

Each document in MongoDB comes up with its own overhead. The overhead for a single document may not be much but multiple documents can make matters worse for your application. To optimize your collections, you can use these techniques.

  • If you have worked with MongoDB then you would have noticed that it automatically creates an “_id” field for each document and adds a unique 12-byte “ObjectId”. MongoDB indexes the “_id” field. However, this indexing may waste storage. To optimize your collection, modify “_id” field’s value when you create a new document. What this does is that it helps to save a value which could have been assigned to another document. While there is no explicit restriction to use a value for the “_id” field but do not forget the fact that it is used as a primary key in MongoDB. Hence, your value must be unique.
  • MongoDB documents store the name of all fields which does not bode well for small documents. In small documents, a large portion of their size can be dictated due to the number of their fields. Therefore, what you can do is that make sure that you use small and relevant names for fields. For instance, if there is the following field.

father_name: “Martin”

Then you can change it by writing the following.

f_name : “Martin”

At first glance, you may have only reduced 5 letters but for the application, you have decreased a significant number of bytes which are used to represent the field. When you will do the same for all queries then it can make a noticeable difference.

Let’s see how this works with an example 

The major choice which you have to think around while working for data modeling in MongoDB is what does your DOCUMENT structure entail? You have to decide what the relationships which represent your data are like whether you are dealing with a one-to-one relationship or a one-to-many relationship. In order to do this, you have two strategies.

Embedded Data Models

MongoDB allows you to “embed” similar data in the same document. The alternative term for embedded data models is de-normalized models. Consider the following format for embedded data models. In this example, the document begins with two standard fields “_id” and “name” to represent the details of a user. However, for contact information and residence, one field is not enough to store data as there are more than one attributes for data. Therefore, you can use the embedded data model to add a document within a document. For “contact_information” curly brackets are used to change the field to a document and add “email_address” and “office_phone”. A similar technique is applied to the residence of the user.

{

_id: “abc”,

name: “Bruce Wayne”,

contact_information: {

email_address: “bruce@ittechbook.com”,

office_phone: ” (123) 456–7890″,

},

residence: {

country: “USA”,

city: “Bothell”,

}


}

The strategy to store similar types of data in the same document is useful for a reason; they limit the number of queries to execute standard operations. However, the questions which might be going around in your mind is, when is the correct time to use an embedded data model? There are two scenarios which can be marked as appropriate for the use of embedded data models.

Firstly, whenever you find a one-to-many relationship in an entity, then it would be wise to infuse embedding. Secondly, whenever you identify an entity with “contains” relationship, then it is also a good time to use this data model. In embedded documents, you can access information by using the dot notation.

One-to-Many Relationship with Embedding

One-to-many is a common type of database relationship where a collection A can match multiple documents in collection B but the latter can only match for one document in A.

Consider the following example to see when de-normalized data models hold an advantage over normalized data models. To select one, you have to consider the growth of documents, access frequency, and similar factors.

In this example, reference is using three examples.

{

_id: “barney”,

name: “Barney Peters”

}

{

user_id: “Barney”,

street: “824 XYZ”,

city: “Baltimore”,

state: “MD”,

zip: “xxxxx”

}

{

user_id: “Barney”,

street: “454 XYZ”,

city: “Boston”,

state: “MA”,

zip: “xxxx”

}

If you can see closely, then it is obvious that the application has to continuously retrieve data for address along with other field names which are not required. As a result, several queries are wasted.

On the other hand, embedding your address field can ensure that the efficiency of your application is boosted and your application will only require a single query.

{

_id: “barney”,

name: “Barney Peters”,

addresses: [

{

user_id: “barney”,

street: “763 UIO Street”,

city: “Baltimore”,

state: “MD”,

zip: “xxxxx”

},

{

user_id: “barney”,

street: “102 JK Street”,

city: “Boston”,

state: “MA”,

zip: “xxxxx”

}

]

}

Normalized Data models (References)

In normalized data models, you can utilize references to represent relationship between multiple documents. To understand references, consider the following diagram.

References or normalized data models are used in the cases of one-to-many relationship models and many-to-many relationship models. In some instances of embedded documents model, we might have to repeat some data which could be avoided by using references. For example, see the following example.

mangos

In this example, the “_id” field in the user document references to two other documents that are required to use the same field.

References are suitable for datasets which are based on hierarchy. They can be used to describe multiple many-to-many relationships.

While references provide a greater level of flexibility in comparison to embedding, they also require the applications to issue the suitable follow-up queries for their resolution. Put simply, references can increase the processing between the client-side application and the server.

One-to-Many Relationship with References

There are some cases in which a one-to-many relationship is better off with references rather than embedding. In these scenarios, embedding can cause needless repetition.

{

title: “MongoDB Guide”,

author: [ “Mike Jones”, “Robert Johnson” ],

published_date: ISODate(“2019-1-1”),

pages: 1,200,

language: “English”,

publisher: {

name: “ASD Publishers”,

founded: 2009,

location: “San Francisco”

}

}


{

title: “Java for Beginners”,

author: “Randall James”,

published_date: ISODate(“2019-01-02”),

pages: 800,

language: “English”,

publisher: {

name: “BNM Publishers”,

founded: 2005,

location: “San Francisco”

}

}

As you can realize whenever a query requires the information of a publisher, that information is repeated continuously. By leveraging references, you can improve your performance by storing the information of the publisher in a different collection. In cases, where a single book has limited publishers and the likelihood of their growth is low, references can make a good impact. For instance,

{

name: “ASD Publishers”,

founded: 2009,

location: “San Francisco”

books: [101, 102, …]

}


{

_id: 101

title: “MongoDB Guide”,

author: [ “Mike Jones”, “Robert Johnson” ],

published_date: ISODate(“2019-1-1”),

pages: 1,200,

language: “English }

{

_id: 102

title: “Java for Beginners”,

author: “Randall James”,

published_date: ISODate(“2019-01-02”),

pages: 800,

language: “English”,


}

Factors to Consider in IoT Implementation


Have you resolved to use IoT to power your organization?

The entire process to develop an IoT ecosystem is quite a big challenge. IoT implementation is not comparable to other IT deployments that are largely software-based because it includes multiple components like devices, gateways, and platforms. If you plan to adopt IoT, then you have the following factors to consider in IoT implementation.

Security

The year 2016 turned out to be an unforgettable year for the telecommunication industry. At that time, the telecom infrastructure was badly hit by a DDoS attack. As a consequence, many users faced difficulties while establishing a connection with the internet. Earlier, it was speculated that there was a cyber warfare element in the attack. Nation-backed attacks are nothing new. Over the past few years, the battleground has changed from the land to the digital realm as cybercriminal groups find support from different countries.

However, in this case, the culprit was someone else. It was known as Mirai, a malware. Soon, it was revealed that the malware belonged to the “botnet” category. A botnet is an attack which compromises multiple systems at once and uses them as digital zombies to carry out malicious actions. Mirai was able to bypass several IoT devices. These devices included residential gateways, digital cameras, and even baby monitors! All of these devices were invaded through a brute-force strategy.

Unfortunately, this is just the tip of the iceberg. The botnet is not the only threat looming over IoT. There has been other malware like ransomware which makes matters worse in the Medical IoT. Similarly, last year’s cyber attacks in Bristol Airport and Atlanta Police paint a worrisome picture which illustrates IoT devices as highly insecure against modern cyber attacks.

If any part of the IoT ecosystem of business is hacked, then it offers the perpetrators remote access to trigger actions. Therefore, it is necessary that cybersecurity strategy of any organization dealing with IoT focuses on the complete system security from sensors and actuators to the IoT platforms for minimizing loopholes.

Authentication

Authentication is one of the integral key points for IoT implementation. It is important to ensure that a system’s security is not completely reliant on authentication mechanisms which fall into the category of one-time authentication. An enterprise IoT infrastructure demands that connectivity for devices and endpoints is carefully assessed.

There should be an environment which can be “trusted.” Such an environment entails proper identification of all users, applications, and devices so they can be authenticated easily while eliminating unknown devices from the network. There have to be appropriate roles and access defined for all the linked devices. This ensures that the network can only permit authorized activities. Similarly, the incoming and outgoing data in the ecosystem can only be accessed by the user having the required clearance and authority.

Reference Datasets

The data production from IoT devices can only be useful if it is used in the proper context. This context can be utilized from third-party data which stores information of aggregated values, look-up tables, and historical trends. For instance, if IoT is used in home automation, then it can adjust the temperature of the home. The decision for using an air conditioner to increase cooling in the room or for using a heater to increase the inflow of warm air in the room depends upon the real-time data extraction from the weather data sources. Likewise, in the case of a connected car, the car has to send its location coordinateness to the closest service center. Therefore, it is necessary to ensure that adequate reference points are available for IoT devices.

Standards

During IoT implementation, one has to factor in all the activities related to managing, processing, and saving data in the sensors. This aggregation enriches the value of data by enhancing the frequency, scope, and scale. However, aggregation requires the correct use of different standards.

There are two standards which are associated with aggregation.

  • Technology Standards – They include data aggregation standards (Loading (ETL), Transformation), communication protocols (HTTP), and network protocols (Wi-Fi).
  • Regulatory Standards – They are specified and overseen by federal authorities like HIPAA and FIPP.

The use of standards springs several questions, for example, which standard will be used to manage unstructured data? The traditional relational database store structured data and are queried with SQL. On the other hand, modern databases like MongoDB use NoSQL (Not SQL) to store unstructured data.

Data Sensitivity

When organizations began providing services and products on the digital realm, they collected user information for processing. However, no one exactly knew what happened behind the scene. Was the information only being used to provide better user experience or was it exploited for hidden purposes? Studies revealed that a large chunk of organizations sold their private customer data to third parties.

In the past few years, a strong wave has emerged to improve data transparency for clients. For instance, in May 2018, the European Union implemented GDPR (General Data Protection Regulation). GDPR is a comprehensive list of data privacy regulations, which is created to make organizations transparent about their data processing. The objective behind GDPR is to protect the privacy of EU residents. This law is applied on any business which engages with EU residents, irrespective of the business’ geographical location.

These emerging trends are important for IoT since the sensors and devices are responsible to store and process large datasets. Hence, it is vital that any of this data does not breach privacy laws. There are four main tips for data sensitivity.

  • Understand the exact nature of data which is going to be stored by the IoT equipment.
  • Know the security measures used to encrypt or secure data.
  • Identify roles in the businesses which access the data.
  • Learn data processing of each component of the IoT ecosystem.


What Is the Internet of Things Ecosystem Composed of?


IOT

The internet of things is quite popular nowadays. Many people are familiar with technology and its role in improving the lives of human beings. However, people still do not know much about what makes up the internet of things. Read this post to get the complete picture of the internet of things ecosystem.

Hardware in Device

The “things” in IoT refer to devices. They act as the intermediary between the digital and real world. The chief principle of an IoT device is to gather data. This data is collected with the help of a sensor. If you don’t have enough data on your device, you can utilize a basic sensor. However, industrial applications require an extensive list of sensors. Similarly, there is an actuator which is used to physically trigger an action.

To understand an IoT device, you have to go through multiple factors like size, reliability, lifespan, and most importantly, cost. For instance, a small device like a smartwatch is good to go with a System on a Chip (SoC). Similarly, more complex and bigger solutions require the use of programmable circuits like Arduino or Raspberry Pi. However, if you aim is to install IoT at a manufacturing plant, then you are looking at gigantic solutions like PXI.

Software in Device

While a smart device uses sensors to interact with the real world, it requires an OS that is similar to a robot. The addition of software and hardware elevates a device to a “smart device.” The software establishes communication with other devices (it is called the internet of things for a reason) and other components of the ecosystem like the Cloud. The software enables you to perform real-time business intelligence on the data collected by your hardware (sensors).

The right development of the software in your device is extremely critical. The better the code, the more features you can create from your IoT ecosystem. Bear in mind that adding the hardware part is tricky and costly in the IoT. Therefore, instead of focusing on your hardware, you should work hard on the software of your devices. Afterward, you can fit it into any piece of hardware. The software is classified into two sections.

  • Edge OS

It deals with your operating system. For instance, the type of I/O functionality you will require in the future. Similarly, you have to create a number of OS-level settings so your application layer runs easily.

  • Edge Applications

It is the application layer of the software. The application layer is the real deal to customize the processing. For instance, if you have installed an IoT device in a manufacturing plant, then you can use the software to look for a rapid increase or decrease in temperature. When the device senses a huge difference, it can instantly notify the authorities and enable the plant’s system to react in time.

Communications

In the internet of things ecosystem, communication refers to the networking of your device. How is your device going to establish a connection with the outer digital world? Likewise, it also includes the protocols which have to be used. For example, your business may operate on LAN. To ensure that your devices only “talk” with other connected devices, you have to create a tailored network design for your sensors.

Today, smart buildings use BACnet protocol with their systems. If you plan to use your device for home automation purposes, then you can make sure that it runs on the BACnet protocol. Even if your objective is to use it for a different purpose, it may prove helpful in the future to establish a connection between your device and others.

Likewise, you have to plan the connection of your sensors with the Cloud. In some cases, you may want to keep the data private in certain sensors.

Gateway

The bidirectional exchange of data between an IoT network and protocol is carried out by a gateway. The job of a gateway is similar to a translator; it glues the entire ecosystem as it can take data from a sensor and forward it to any other component of the ecosystem.

Gateways can also be used to perform specific operations. For instance, an IoT provider can use a gateway to trigger an action on the sensor’s accumulated information. When gateways complete their set of routines, they transfer information to other parts of the ecosystem.

Gateways are especially useful to add security in a solution. Encryption techniques can be used with gateways to hide data. Therefore, it can serve as a vital shield to stop a cyber attack, especially the ones targeted at IoT like botnets.

Cloud Platform

The Cloud Platform is perhaps the most important of all the components. Cloud enthusiasts will particularly find it familiar to their “software-as-a-service” model. Your platform is linked to the following segments.

Amassing Data

Remember how we talked earlier how sensors collect data? Sensors stream that data to the Cloud. While creating your IoT solution, you will be well aware of your data requirements like the total amount of data you will process in a day, week, month, or year! Here, data management is necessary to address scalability concerns.

Analytics

Analytics include processing the data, identify patterns, forecasting, and using ML algorithms. The use of analytics helps smart devices in creating meaningful information out of a cluster of disorganized data.

APIs

APIs can be introduced on the device or at the Cloud level. With APIs, you can link different stakeholders in your IoT ecosystems, such as your clients and partners, to allow for seamless communication.

Cloud Applications

This is the easiest path for non-IT folks. It is the end-user of the ecosystem. This is where the client engages in an interaction with the IoT ecosystem. The application in your wearable smartwatch is an example.

As long as your smart device consists of a display, your client is bound to have an application to interact. This assists in getting access to smart devices from any place and at any time.

How Does Random Forest Algorithm Work?


One of the most popular machine learning algorithms is the random forest algorithm. In real life nature, a forest is measured according to the number of its trees. A bigger number points towards a healthy forest. The random forest algorithm functions on the same principle of nature. As its name suggests, it creates a forest with trees. However, these trees we are talking about are the decision trees which we have covered in one of our earlier posts. These decision trees allow a random forest to make accurate forecasting decisions.

The forest is referred to as random because of the randomness of its components. Each of the trees in this forest receives training through a procedure known as the bagging method. This method enhances the final result of the algorithm.

The classifier class in a random forest is convenient. While the trees in the forest grow, the algorithm applies to achieve a greater degree of randomness.

In other algorithms, the best feature is determined during the split of a node. In this one, when the algorithm is in the working stage, the best random feature out of a collection is searched. This is done in order to enhance the model’s diversity.

Bear in mind that out of all the features, only a select few are assessed by the random forest during a node’s split. For further randomness in its trees, another technique known as the random threshold is used where they are equipped with all the individual features.

To illustrate this point, take the example of a man named Bob who wants to dine at a new restaurant. Bob asks his friend James for a few suggestions. James asks Bob questions related to his likes and dislikes in food, budget, area, and other relevant questions. In the end, James uses Bob’s answers to suggest a suitable restaurant. This whole process mirrors a decision tree.

Moving forward, Bob is not happy with the recommendation of James and wants to explore other dining options. Thus, he begins asking other friends for their recommendations. He goes to 5 more people who act similar to James; they ask him relevant questions to provide a recommendation. In the end, Bob goes through all the answers and picks the most common answer. Here, each of Bob’s friend acts as a decision tree and their combined answers generate a random forest.

Determining the relative importance of the feature of a prediction is easy in random forest, especially if it is compared with others. If you are looking for a tool which can aid you to calculate such values, then do consider the scikit-learn—a machine learning library in Python.

In the post-training period, a score is assigned to all of the features so the results can be scaled. This makes sure that a zero value is placed for each of the importance sum.

The assessment of feature importance is crucial in order to drop a feature. Usually, a feature is dropped when it struggles to add anything of value to the prediction. This is done because too many features pose the issue of over-fitting.

Hyper-parameters

One of the factors that make random forest unique is the precise output which does not require tuning of hyper-parameters. Like a decision tree, a random forest carries its own hyper-parameters.

In random forest, hyper-parameters are used for increasing the speed of the model. Following are the scikit-learn’s hyper-parameters.

  • n_jobs

It provides the engine with details about the limit of processor for computational usage. If it has a “1” value, then this indicates that only a single processor can be run. On the contrary a “-1” value indicates that there is no restriction.

  • N_estimators

It is the overall number of trees to be generated in the time period before the determination of max voting and averages for predictions. A larger number of figures increases reliability but it also affects the performance speed.

  • random_state

It is used to convert the model’s output to create a replicable result. If similar piece of training data, a definite value for random_state, and hyper-parameters are inserted in the model, then the output would also be identical.

  • min_sample_leaf

It examines the lowest limit of a leaf for the split of internet nodes.

  • Max_features

It takes the figure of maximum digit of features that are required to be used in each tree.

Now that you have understood how a random forest algorithm works, you should begin implementing through coding. For more information about machine learning, check other blogs on our website.

What Is Classification and Regression in Machine Learning?


ml


Machine learning is divided into types: supervised and unsupervised machine learning. In supervised machine learning, inputs and outputs are offered. To aid judgment in future, it offers several algorithms of fixed quantities. Supervised machine learning algorithms have come up with applications like chatbots, facial expression system, etc.

Both classification and regression fall into the category of supervised learning. So what are they and why is it necessary to understand them?

Classification

If your dataset requires you to work with discrete values, then you should use classification. When the solution to a problem demands a definite or predetermined range of output, then you most probably have to deal with classification. The following scenarios are one of the few examples where classification is used.

  • To determine consumer demographics.
  • To predict the likelihood of a loan.
  • To check who wins or lose a coin toss.

When a problem can have only two answers (yes or no), then such a classification falls under the category binary classification.

On the other hand, multi-label classification processes several variables. This type of classification comes handy in the above-mentioned consumer segmentation, grouping images, and text and audio analysis. For instance, a sports blog can have posted about multiple sports like basketball, baseball, tennis, football, and others, at the same time.

There is also the multi-class classification in which a target defines a sample. For example, it is possible for a fruit to be apple or banana but it cannot become both at the same time.

Classification computes only those values which are “observed”. It relies on the total of its input to compute forecasting which offers more than a single result. The algorithm which maps a provided input into a specific category is referred to as the classifier. The feature is a measurable variable.

Before the creation of a classification model, firstly you have to pick a classifier and have it initialized. Subsequently, you have to provide some training to that classifier. In the end, you can check the output for the observed x values to predict the label y.

Regression

Regression works opposite to classification; it is used for the prediction of results where continuous values are at play. In regression, the variables are flexible and can be modified, unlike classification hence; there is no need to restrict to a fixed set of labels.

Linear regression is one of the leading algorithms. Sometimes, linear regression is underestimated as some perceive its working to be too easy. However, in actuality, linear regression can be used in multiple cases, as it is quite simple in comparison to others. You can use logistic regression to estimate the prices of property, assess the churn rate of customers, and even manage the collection of money from that person.

For more details, keep following this blog series. If you have any questions, then you contact us to clear up your confusion.

How Has Google Improved Its Data Center Management Through Artificial Intelligence


Historically, the staff at data centers adjusted the settings of the cooling systems to save energy costs. Times have changed, and this is the sweet age of AI where intelligent systems are on guard 24/7 and automatically adjust these settings to save costs.

Last year, a tornado watch prompted Google’s AI system to take control of its cooling plant in a data center and it modified the system settings. The staff at Google was initially perplexed because the changes did not make sense at the time. However, after a closer inspection, the AI system was found to be taking a course of action that reduced the energy consumption.

The increase and decrease in temperature, humidity levels, and atmospheric pressure force the change in weather conditions, and they can stir a storm. This weather data is used by Google’s AI to adjust the cooling system accordingly.

Joe Kava, Google’s Vice President of data centers, revealed Google’s use of AI for data centers back in 2014. At that time, Kava explained that the company designed a neural network to assess the data which is collected from its data centers and suggested a few strategies to enhance its processing. These suggestions were later utilized as a recommendation engine.

Kava explained that they had a single solution which would provide them with recommendations and suggestions. Afterward, the qualified staff at Google would begin modifying the pumps, heat exchangers, and chillers settings according to the results of AI-based recommendations. In the last four years, Google’s AI usage has evolved beyond Kava’s proposed vision.

Presently, Google is adopting a more aggressive approach. Instead of only dishing out recommendations to the human operators could act on them, the new system would itself go onto adjust the cooling settings. Jim Gao, a data engineer at Google, said that the previous system saved 20 percent energy costs and that the newer update would save up to 40 percent in energy consumption.

Little Adjustments

The tornado watch is only a single real-world instance of Google’s powerful AI and its impact on energy savings to an extent which was impossible with manual processes. While at first glance, the minor adjustments done by the AI-enabled system might not seem enough. However, the sum of each savings results in a huge total.

Kava explains that the detailing performed by the AI systems makes it matchless. For instance, if the temperature in the surroundings of the data center goes from 60 degrees Fahrenheit to 64 degree Fahrenheit while the wet-bulb temperature is unaffected, then an individual from the data center staff would not go think much about updating the settings of the cooling system. However, the AI-based system is not so negligent. Whether there is a difference of 4 degrees or 40 degrees, it keeps on going.

One interesting observation regarding the system was its noticeably improved performance during the launch of new data centers. Generally, new data centers are not efficient as they are unable to get the most of the available capacity.

From Semi to Full Automation

The transfer of critical tasks of the infrastructure to the AI system has its own implications and considerations.

With the increase of data and runtime, the AI system becomes more and more powerful and therefore, management also starts to have faith in the system, enough to give it some control. Kava explained that after some experimentation and results, slowly and gradually the semi-automated tools and equipment are replaced by fully automated tools and equipment.

Uniformity is the key to Google’s AI exploits; it is not possible to implement AI at such a massive scale without uniformity. All the data centers are designed to be distinct such that a single AI system is not possible to be integrated across all of them at the same time.

The cooling system of all the data centers are constructed for maximum optimization according to their geographical locations. Google has tasked its data engineering team to continuously look for any possible techniques for energy savings.

Additionally, ML-based models are trained according to their sites. The models have to be programmed to follow that site’s architecture. This process takes some time. However, Google is positive that this consumption of time would result in better results in the future.

The Fear of Automation

One major discussion point with this rapid AI automation and similar AI-based ventures is the future of “humans” or the replacement of the humans. Are the data center engineers from Google going to lose their jobs? This question contains one of mankind’s biggest fears regarding AI. As AI progresses, this uncertainty has crept into the minds of workers. However, Kava is not worried. Kava stated that Google still has staff at its disposal at data centers that is responsible for maintenance. While AI may have replaced some of their “chores”, the staff still has to perform corrective repairs and preventative maintenance.

Kava also shed some light on some of AI’s weaknesses. For instance, he explained that whenever the AI system finds itself in the midst of uncharted territory, it struggles to choose the best course of action. Therefore, it is unable to mimic the brilliance of humans in making astute observations. Kava concluded that it is recommended to use AI for cooling and other data center related tasks, though he cautioned that there must be some “human” presence to ensure that nothing goes amiss.

Final Thoughts

Google’s vision, planning, and execution of AI in its data centers are promising for other industries too. Gao’s model is believed to be applicable to manufacturing plants that also have similar setups like cooling and heating systems. Similarly, a chemical plant could also take advantage of AI and likewise, a petroleum refinery may use AI in the same way. The actual realization is that, in the end, such AI-based systems can be adopted by other companies to enhance their systems.

The Growing Role of Artificial Intelligence in Data Centers


According to Infosys, more than 75 percent of IT experts view artificial intelligence as a permanent strategic priority which can assist them in innovating their organization’s structure. Infosys’ survey receives credibility from the fact that the AI systems are expected to receive investments worth $57 billion by the year 2021. That being said, the implementation of AI is a complex task which requires considerable time and decision-making to go smoothly. Today, AI has initiated the transformation of all the global industries.

One of such industries is the data center industry where AI is making its mark slowly and gradually. Data centers power the operations of organizations all around the world. The data volumes are increasing daily, putting more and more strain on the hardware and software setups in the organization. Consequently, managers are forced to introduce new servers and hardware equipment so their IT infrastructure becomes powerful enough to store and process data without any issue. Currently, most of the centers are not able to maximize their output because they use legacy systems. So how is AI transforming data centers?

Energy Consumption

Energy consumption remains one of the most critical and dire issues in data centers. Bear in mind that as of now, about 6 percent of the world’s electricity is used by data centers. With the computing requirements climbing up day-by-day, it is fair to assume that the energy consumption of data centers will also increase.

On one hand, companies have to address the cost factor, and on the other hand, global warming is mounting pressure on organizations to do their part and act more ‘responsibly’ towards the environment. Particularly, the data center industry is one of those industries that are viewed negatively by the supporters of green energy.

Some data centers have attempted to address such issues by accepting renewable energy. However, there are qualms about its ineffectiveness for smaller setups. There are few companies that have resorted to AI as the answer to their common problems.

AI is being used for real-time monitoring to reduce energy consumption. Moreover, AI is used for parallel and distributed computing to achieve a greater level of productivity. Some organizations have identified and resolved networking troubleshooting via AI. Similarly, there are those who adjust their heating and cooling mechanisms via AI. Due to the widespread use of artificial intelligence, there is no need for staff members to continuously manage mundane tasks such as setting the office temperature.

Security

Security is also one of the most pressing issues for data centers. Cybercriminals have particularly set their eyes on the data centers. With the amount of sensitive data being stored in these data centers, it is not surprising that hackers try to target these centers. For instance, if a cybercriminal group succeeds in a ransomware attack on a data center then by just locking the servers, they bring the entire organization down on its knees. Dreading the losses due to downtime and reputational damage, the company has no option but to pay a ransom to save their data center from complete destruction. Unfortunately, ransom payment does not guarantee the return of data. While organizations are trying their best to infuse the most effective measures to restrict such attacks, they have found AI as an underrated ally in their proactive action against cyber attacks.

AI’s addition in the equation offers a greater level of flexibility and sophistication to protect the data and minimize the dependence of systems on manual intervention. Unlike humans, AI can be available 24/7 and may become the wall that ultimately safeguards you from a cyber attack. For instance, Darktrace—a British organization—leveraged AI to specify a normal network behavior where cyber threats are assessed and identified on the basis of a deviated activity.

Data Center Staffing

AI is also offering a chance for organizations to reduce their staff shortages so they can assign their qualified personnel to the relevant areas. It is expected that with AI in the mix, the standard tech support responsibilities in the center would be handed over to AI-based systems.  These responsibilities would include automation of routine and mundane tasks like the following:

  • Resolving any incoming issue.
  • Working on the help desk support.
  • Provision of services and resources.

Additionally, AI would provide an edge by capturing new symptoms, events, and scenarios for the generation of a functional knowledge base to aid the external and internal stakeholders to learn from the past issues and avoid repeating the same mistakes in future.

However, there will be times when human intervention would be necessary. In such cases, a connection can be established with senior staff members who can fulfill the required task through their years of experience.

Predictive Analytics

With enhanced outage monitoring, AI is providing a major advantage to data centers. AI systems are able to detect and predict any incoming data outage. They can continuously track the performance of all the servers and assess the storage operations like the utilization of disk.

All of this has been made possible through contemporary predictive analytics tools which do not only increase reliability but also are fairly easy to use. Probably the biggest advantage of predictive analytics is that it supervises the workload through optimization, lessens the burden from systems, and distributes the workload more evenly among all the hardware tools.

This modern outlook of data centers is widely different from the conventional data center practices. Traditionally, such troubleshooting was based completely on manual assistance, research, and computation—computers were merely a tool to execute and command their strategies. AI, on the other hand, positions itself as an independent player which can be seen more as a professional colleague rather than a tool.

Final Thoughts

As the management of data centers becomes tougher and more complex with the passing time, AI has been a welcome entry in the space as an IT technology. AI has improved the overall output without any notable compromise. It remains to be seen what more advancements arrive in data centers in the near future. For the time being, AI has done a marvelous job at managing data centers.

How Does a Decision Tree Function?


In the last post, we discussed how artificial neural networks are modeled on a human brain. There are other algorithms too which have been inspired by the real world. For instance, we have the decision tree algorithm in machine learning which is founded on the basis of a tree. Such an algorithm is used for decision analysis. The algorithm is also frequently used in data mining to derive meaningful results. So, how exactly does it work?

To understand a decision tree, let’s suppose an elementary example in which we have a dataset of passengers of a ship. It is expected that a violent storm would cause the ship to get wrecked. Now the problem at hand is to predict the survival rate of a passenger based on their characteristics. Their attributes (also known as features) are mainly their age, spch (any spouse or children with them), and age.

dtree

As you can see, a decision tree is visually represented in an upside-down approach where instead of placing the root at the top, we present it at the top. The italicized text which shows our condition represents the internal node which divides the three into edges (branches). The branch which is not divided any further is referred to as the decision (leaf).

If you analyze the above example, then you can recognize the fact that all the relevant relations are easily viewable, thereby making for strong feature importance. This approach is also called a “learning decision tree from data”. The tree in our drawn example is categorized under a classification tree as it is used to classify the survival rate or fatality rate of a passenger tree. The other category is known as regression tree which is not too dissimilar, except for the fact that they deal with continuous values. The decision tree algorithms are broadly depicted as CAT— Classification and Regression Trees.

The growth of a decision tree depends upon its features (attributes or characteristics) and the conditions which are used to divide the tree with a clear intent about the stopping point of the three. Often, the growth of tree exceeds to arbitrary levels where some trimming is required for better results.

Recursive Binary Splitting

Recursive binary splitting uses a cost function to test all the features and the split points. For instance, in the above example from the root, all features were analyzed after which groups were formed from the divisions of the training data. Our example has 3 examples which mean we require 3 splits. Subsequently, we are going to compute the cost of each split in terms of accuracy. When the least costly split is discovered, which refers to the sex feature in our example then the feature is chosen. This approach of the algorithm is naturally recursive because more groups can undergo subdivisions by repeating the same process. Therefore, the algorithm falls into the category of greedy algorithms. This also means that the most effective classifier is the root node.

Split Cost

Let’s try to understand cost functions more closely while working with classification and regression. Cost functions always attempt to identify the branches which exhibit similarity. Therefore, it is certain that any input which is test data is bound to adhere to the specific path.

Regression: sum(y-prediction)^2

For instance, consider the real estate industry a problem requires the prediction of house prices. In this case, the decision tree initiates the splitting processing and analyzes all the features from the training data. It calculates the input of training data to generate mean for responses which are treated as a prediction for their respective groups. The function is performed for all the data points while a cost is generated for the candidate splits. In the end, the split which consumed the smallest cost is chosen.

Classification: G = sum(pk * (1 — pk))

To determine the quality of a split, the gini score is used which assesses the mixing of the response classes in the split’s groups. In the above equation, pk refers to the proportion in which a particular group has similar class inputs. Maximum purity of a class is achieved when it established that a group encompasses the same class’ inputs. In such a scenario the value of pk maybe either 0 or 1 while G remains 0. The worst purity is established when a node gets 50-50 split for a group’s classes. In binary classification, the values of pk and G would be 0.5 each in such a scenario.

Putting a Stop to Split

There is a point at which the split of the tree must be stopped. Generally, problems have several features which means that the resulting split is also huge, thereby creating a large tree. This is an undesired scenario because such trees raise over-fitting issues. One strategy for stopping a split is to define the lowest number for training inputs which are to be assigned for all the leaves. For instance, in the above example, we can take 15 passengers to reach a consensus or decision for survival or death whereas any leaf which is bombarded with less than 15 passengers is duly rejected. Conversely, you can also define the max depth for the model. Max depth is the longest path’s total length which exists between a root and a tree.

Pruning is used to enhance the performance of a decision tree. In pruning, any branch with low or weak feature importance is eliminated, thereby minimizing the tree’s complexity and boosting its predictive strength. Pruning can either initiate from the leaves or the root. In simpler scenarios, pruning begins from the leaves where it eliminates nodes that have the most popular class of that leaf unless they are not violating accuracy. This strategy is also called as reduced error pruning.

Final Thoughts

The above-mentioned knowledge is enough to complete your initial understanding of a decision tree. You can begin its coding by using Python’s Scikit-Learn library.

What Is Artificial Neural Network and How Does It Work?


The whole idea behind artificial intelligence is to make a machine act like a human being. While many sub-divisions of AI originated with their own set of algorithms to mimic humans, artificial neural networks (ANNs) are AI at its purest sense; they mimic the working of the human brain, the core and complex foundation which influences and affects the thinking and reasoning of human beings.

What Is an Artificial Neural Network?

ANN is a machine learning algorithm. It is founded on the scientific knowledge about organic neural networks (working of the human brain). ANN works quite similar to how human beings analyze and review information. It is composed of several processing units which are linked together and perform parallel processing for the computation of data.

As machine learning is primarily focused on “learning,” ANNs continuously learn and adapt. The processing units in ANNs are commonly referred to as neurons or nodes. Bear in mind that neuron in biology refers to the most basic units in the human nervous system. Each node is linked via arcs which have their own weight. The artificial neural network is made up of three layers.

Input

The input layer is responsible for accepting explanatory attribute values which are collected from observations. Generally, input nodes are explanatory variables. Patterns are submitted to the network by the input layer. Subsequently, those patterns are then analyzed by the hidden layers. The input layer nodes are not involved in modifying any data. They accept individual values as inputs and then perform duplication of the value so it can be passed on to multiple outputs.

Hidden

The hidden layers modify and transform values collected from the input layer. By utilizing a technique of weight links or connections, the hidden layer initiates computation on the data. The number of hidden layers depends upon the artificial neural network; there may be one or more than one hidden layers. Nodes in this layer multiply the collected values by the weights. Weights are a predetermined set of numbers which convert the input values with the help of summation to generate an output in the form of a number.

Output

Afterward, the hidden layers are connected to an output layer which may also receive a connection directly from an input layer. It generates a result, which is associated with the response variable’s prediction. Generally, when the machine learning process is geared towards classification and its disciplines, there is a single output node. The collected data in the layer is integrated and modified for the generation of new values.

The structure of a neural network is also called topology or architecture. All the above layers of the ANN form the structure. The planned design of the structure bears utmost importance to the final findings of the ANN. At its most basic, a structure is divided into two layers which are comprised of one unit each.

The output unit also possesses two functions: combination and transfer. When there are multiple output units, then logistic or linear regression can be at work and the nature of the function ultimately decides it. ANN’s weights are actually coefficients (regression).

So what do the hidden layers do? Well, the hidden layers are incorporated into ANNs to enhance the prediction strength. However, it is recommended to add them smartly because excessive use of these layers may mean that the neural network stores all the learning data and may not able to generalize, causing an over-fitting problem. Over-fitting arises when the neural network is not able to discover patterns and is heavily reliant on its learning set to function.

ai1


Applications

Due to their accurate predictions, ANNs have broad adoption across multiple industries.

Marketing

Modern marketing focuses on segmenting customers within well-defined and distinct groups. Each of these groups exhibits certain characters that are reflecting of its customer habits. In order to generate such segmentation, neural networks present themselves as an efficient solution for predicting strength to identify patterns in a customer’s purchasing habits.

For instance, it can analyze how much time customers take between each purchase, how much do they spend, and what do they mostly purchase. ANN’s input layer takes all the attributes like location, demographics, and other personal or financial information about a customer to generate meaningful output.

Supervised neural networks are usually trained to comprehend the link between clusters of data. On the other hand, unsupervised neural networks are used for segmentation of customers.

Forecasting

Forecasting is a part and parcel of a varied list of domains including governments, sales, finance, and other industries, especially their use in the monetary and economic aspects. Often, forecasting faces a tumbling roadblock because of its complexity. For instance, the prediction of stocks is considered difficult because the stock market addresses multiple seen and unseen factors where traditional forecasting becomes ineffective.

This conventional forecasting is founded merely on statistics. ANNs use the same statistical methods and techniques and enhances forecasting where its layers are sophisticated enough to tackle the complexity of the stock market. Moreover, in contrast to the conventional methods, ANN is non-restrictive for input values and residual distributions.

Image Processing

Since the layers in artificial neural networks are able to accept several input values and compute them flexibly to determine complex and non-linear hidden relationships, they are well-equipped to serve in image processing and character recognition. In criminal proceedings like bank frauds, fraud detection requires accurate results for character recognition because humans cannot go over thousands of samples to pinpoint a match. Here, ANNs are useful as they are able to recognize the smallest of irregularities. Similarly, ANN is used in facial recognition with positive results where they are able to improve governance and security.

Final Thoughts

The emergence of artificial neural networks has opened a whole new world of possibilities for machine learning. With their adoption in real-world industries, the algorithm has become one of the most trending and research topics in a short period of time.

What Are Text Indexes in MongoDB?


MongoDB offers text indexes for search queries which include strings in their contents. At most, a collection in MongoDB can have no more than one text index. So the question is: how to build a text index?

Like other indexes, a text index can also be created using the db.collection.createIndex() method. Such an index can be built on a string array too. To define a text index for a field, you have to type “text” like the following instance.

db.employees.createIndex( {name:”text”} )

In this example, a text index has been built on the “name” field. Similarly, other fields can also be defined by using the same index.

Weights

While working with text indexes, you must become familiar with the concept of weight. Weight refers to an indexed field and marks its importance in comparison to other fields (which are also indexed) by processing the score for text search.

In all the indexed fields of a document, the match number is multiplied with the weight and the output is summed. MongoDB then takes the sum value and processes it to generate the document’s score.

By default, each indexed field carries a weight of 1. Weights can be modified in the db.collection.createIndex() method.

Wildcard Specifier

In MongoDB, there is also a wildcard specifier ($**). When this specifier is used in conjunction with a text index then it is referred to as a wildcard text index. What this does is that it applies indexing on every field which stores data in the form of strings for all the collection’s document. A wildcard specifier can be defined by using the following method.

db.collection.createIndex( {“S**”: “text”} )

Basically, wildcard text indexes can be seen as text indexes which work on more than a single field. To govern the query results’ ranking, weights can be specified for certain fields while building text indexes.

Case Insensitivity

The 3rd (latest) version of the text index offers support for the simple s and common c. The special T case folding found in Turkish is also supported.


The case insensitivity of the text index is further improved with support for diacritic insensitivity (a mark which represents different pronunciation) like É and é. This means that the text index does not differentiate between e, E, é, and É.

Tokenization

For purposes related to tokenization, the text index version 3 supports the following delimiters.

  • Hyphen
  • Dash
  • Quotation_Mark
  • White_Space
  • Terminal_Punctuation
  • Dash

For instance, if a text index finds the following text string, then it would treat spaces and “« »” as delimiters.

«Messi est l’un des plus grands footballeurs de tous les temps»

Sparse

By default, text indexes are “sparse” and therefore they do not need to be explicitly defined with the sparse option. When a document does not have a field indexed with a text index, then MongoDB does not make the document’s entry with the text index. When insertion occurs, then MongoDB does insert the document, however no addition occurs with the text index.

Limitations

Earlier, we talked about how there can be no more one text index for a collection. There are some more limitations for text indexes.

  • When a query entails the $text operator, then it is not possible to use the hint() method.
  • It is not possible for sort operations to utilize the text index’s arrangement or ordering, even if it is a compound text index.
  • It is possible to add a text index key to generate a compound index. Though, they have some limitations. For example, it is not possible to use special index types like geospatial index with a compound text index.

Moreover, while building a compound text index, all text index keys have to be defined adjacently. This specifying of index must come in the index specification document.

Lastly, if there are keys which precede the key of text index, then for executing a search with $text operation, it is necessary for the query predicate to use quality match conditions for the preceding keys.

  • For dropping a text index, it is mandatory to mention the index name in the method of db.collection.dropIndex(). In case you do not know the index name, the db.collection.getIndexes() method can be used.
  • There is no support for collation while working with text indexes. However, they do provide support for simple binary comparison.

Performance and Storage Constraints

While using text indexes, it is necessary to realize their impact on the performance and storage of your application

  • The creation of a text index is not too dissimilar to creating a huge multikey index. A text index takes considerably more time in comparison to a basic ordered index.
  • Considering the nature of applications, it is possible for text indexes to be “enormous”. They carry a single entry for an index in correspondence with every unique or special post-stemmed word for all the indexed fields whenever documents are inserted.
  • Text indexes do not save information or phrases related to a word’s proximity within the document. Therefore, queries with phrases run better in comparison if the complete collection is fitted into the RAM.
  • Text indexes have an effect on insertion operations in MongoDB. This is because MongoDB has to include entries for index with every post-stemmed string in indexed fields related to every newly-created source document.
  • While creating a big text index for a collection which exists for some time, make sure that you have a strong limit for open file descriptions.

$text Operator

The $text operator is used to conduct a textual search for a field’s contents which is text-indexed. An expression with the text operator has the following components.

  • $search – A single or multiple terms which is used by MongoDB for parsing and querying text indexes.
  • $language – An optional component which represents the language that is to be used for tokenizer, stemmer, and stop-words.
  • $caseSensitive – An optional component which is used to turn on or off the case sensitive search.
  • $diacriticSensitive – An optional component which is used to turn on or off the diacritic sensitive search.

An Introduction to Multikey Indexes with Examples


After understanding single-field and compound indexes, now is the time to learn about multikey indexes. When a field has an array value, an index key is generated for each of its array elements. These indexes are referred as multikey indexes. They can be used with arrays that have scalar values as well as those with nested documents.

To generate a multikey index, you have to use the standard db.collection.createIndex() method. Such indexes are automatically generated by MongoDB whenever it senses an indexed field specified as an array. Hence, there is no need for explicit definition of a multikey index.

Examples

While working with a standard array, let’s suppose we have a collection “student”.

{ _id: 21, name: “Adam”, marks: [ 80, 50, 90 ] }

To build an index on the “marks” field, write the following query.

db.student.createIndex( { marks: 1 } )

As the marks field is an array, thus this index is an example of a multikey index. All of the keys (80, 50, and 90) in its elements point to the same document.

To create a multikey index for array fields having embedded documents, let’s suppose we have a collection “products”.

{

_id: 5,

name: “tshirt”,

details: [

{ size: “large”, type: “polo”, stock:50 },

{ size: “small”, type: “crew neck”, stock:40 },

{ size: “medium”, type: “v neck”, stock: 60 }

]

}

{

_id: 6,

name: “pants”,

details: [

{ size: “large”, type: “cargo”, stock: 35 },

{ size: “small”, type: “jeans”, stock: 65 },

{ size: “medium”, type: “harem”, stock: 10 },

{ size: “large”, type: “cotton”, stock: 10 }

]

}

{

_id: 7,

name: “jacket”,

details: [

{ size: “large”, type: “bomber”, stock: 35 },

{ size: “medium”, type: “leather”, stock: 25 },

{ size: “medium”, type: “parka”, stock: 45 }

]

}

We can build a multikey index with the details.size and details.stock fields.

db.products.createIndex( { “details.size”: 1, “details.stock”: 1 } )

This index is now good to go against queries which have only a single field of “details.size” as well as queries having the both of the indexed fields. As such, these types of queries would benefit from the index.

db.products.find( { “details.size”: “medium” } )

db.products.find( { “details.size”: “small”, “details.stock”: { $gt: 10 } } )

Bounds in Multikey Index

Bounds represent the limits of an index .i.e. how much it needs to scan for searching a query’s results. If there are more than a single predicate with an index, then MongoDB integrates them through compounding or intersection. So what do we mean by intersection and compounding?

Intersection

Bounds intersection point towards the presence of “AND” (logical conjunction) for bounds. For example, if there are two bounds [ 4, Infinity]  and [ – Infinity, 8 ], then intersection bounds process [[4, 8 ]] When $elemMatch operation is used, then MongoDB applies intersection on multikey index bounds.


What Is $elemMatch?

Before moving forward, let’s understand the use of $elemMatch first.

$elemMatch is used for matching documents in array field where at the bare minimum, atleast one of the element is matched with the query. Bear in mind, that the operator does not work with $text and $where operators. For a basic example, consider a “student” collection.

{ _id: 8, marks: [ 72, 75, 78 ] }

{ _id: 9, marks: [ 65, 78, 79 ] }

The following query only processes a match with documents in which the “marks” array has at least a single element which is less than 75 and greater or equal to 70.

db.student.find(

{ marks: { $elemMatch: { $gte: 70, $lt: 75 } } }

In response, the result set is comprised of the following output.

{ “_id” : 8, “marks” : [72, 75, 78 ] }

Despite the fact that both 75 and 78 do not conform to the conditions but because 72 had a matched, hence the $elemMatch selected it.


For instance, we have a collection student which has a field “name” and an array field “marks”.

{ _id: 4, name: “ABC”, marks: [ 1, 10 ] }

{ _id: 5, name: “XYZ”, marks: [ 5, 4 ] }

To build a multikey index with the “marks” array.

db.student.createIndex( { marks: 1 } )

Now, the following query makes use of $elemMatch which means that the array must have at least one element which fulfils the condition of both predicates.

db.student.find( { marks : { $elemMatch: { $gte: 4, $lte: 8 } } } )

Computing the predicates one by one:

  • For the first predicate, the bounds are equal to or greater than 4 [ [ 4, Infinity ] ].
  • For the second predicate, the bounds are equal to or less than 8 [ [ – Infinity, 8 ] ].

Since $elemMatch is used here, therefore MongoDB can apply intersection on the bounds and integrate it like the following.

marks: [ [ 4, 8 ] ]

On the other hand, if the $elemMatch is not used, then MongoDB applies intersection on the multikey index bounds. For instance, check the following query.

db.student.find( { marks : { $gte: 4, $lte: 8 } } )

The query processes the marks array for atleast a single element which is equal to or greater than 4 “AND” atleast a single element which is equal to or less than 8. However, it is not necessary for a single element to conform to the requirements of both predicates, hence MongoDB does not apply intersection on the bounds and uses either [[4, Infinity]] or [[-Infinity, 8]].

Compounding

Compounding bounds means the use of bounds with compound index. For example, if there a compound index { x: 1, y:1 } which has a bound on the x field  [[4, Infinity] ] and a bound on the field y [[-Infinity, 8]]. By applying compounding,

{ x: [ [ 4, Infinity ] ], y: [ [ -Infinity, 8 ] ] }

Sometimes, MongoDB is unable to apply compounding on the given bounds. For such scenarios, it uses the bound on the leading field which in our example is x: [ [4, Infinity] ].

Suppose in our example indexing is applied on multiple fields, where one of the fields is an array. For instance, we have the collection student which stores the “name” and “marks” field.

{ _id: 10, name: “Adam”, marks: [ 1, 10 ] }

{ _id: 11, name: “William”, marks: [ 5, 4 ] }

Build a compound index with the “name” and the “marks” field.

db.student.createIndex( { name: 1, marks: 1 } )

In the following query, there is a condition which applies on both of the indexed keys.

db.student.find( { name: “William”, marks: { $gte: 4 } } )

Computing these predicates step-by-step.

  • For the “name” field, the bounds for the “William” predicate are the following [ [ “William”, “William” ] ].
  • For the “marks” field, the bounds for { $gte: 4 } predicate are [ [ 4, Infinity ] ].

MongoDB can apply compounding on both of these bounds.

{ name: [ [ “William”, “William” ] ], marks: [ [ 4, Infinity ] ] }


What Are Indexes in MongoDB?


What Are Indexes in MongoDB?

When a query is run in MongoDB, the program initiates a collection scan. All the documents which are stored in a collection have to be scanned so that only the appropriate documents can be matched. Obviously, this is a highly wasteful tactic as checking each document results in inefficient utilization of resources.

To address this issue, there is a certain feature in MongoDB known as indexes. Indexes perform as a filter so the scanning pool can be shortened and queries can be executed more “efficiently”. Indexes can be categorized as a “special” type of data structures.

Indexes save parts of a collection’s information (data). What they do is that they save a single or multiple fields’ value. The processing of an index’s content is done order-wise.

By default, MongoDB generates an index for the _id field whenever a collection is built. This index is unique. Due to the presence of this index, it is not possible to insert multiple documents which carry the exact same _id field value. Moreover, unlike other indexes, this index is un-droppable.

How to Create an Index?

Open your Mongo Shell and employ the method “db.collection.createIndex()” for the generation of an index. For the complete format, consider the following.

db.collection.createIndex( <key and index type specification>, <options> )

To develop our own index, let’s suppose we have a field for employee name as “ename”. We can generate an index on it.

db.employee.createIndex( { ename: -1 } )

Types

Indexes are classified in the following categories.

  • Single Field
  • Compound Index
  • Multikey
  • Text Indexes
  • 2dsphere Indexes
  • geoHaystack Indexes


Single Field Indexes

A single-field index is the simplest index of all. As the name suggests, it applies indexing on a single field. We begin our single-field example with a collection “student”. Now, this student collection carries documents like this:

{

“_id”: ObjectId(“681b13b5bc3446894d86cd342”),

“name”: Adam,

“marks”: 400,

“address”: { state: “TX”, city: “Fort Worth” }

}

To generate an index on the “marks” field, we can write the following query.

db.student.createIndex( { marks: 1 } )

We have now successfully generated an index which operates via an ascending order. This order is marked by the value of an index. With “1” as a value, you can define an index which arranges its contents by using the ascending order. On the other hand, a “-1” value defined an index by using the descending order. This index can now work with other queries that involve the use of “marks”. Some of their examples are:

db.student.find( { marks: 2 } )

db.student.find( { marks: { $gt: 5 } } )

In the second query, you might have noticed “$gt”. $gt is a MongoDB operator which translates to “greater than”. Similar operators are $gte (greater than and equal to), $lt (less than), and $lte (less than and equal to). In our upcoming examples, we are going to use these operators heavily. These are used for filtering out documents by specifying limits.

It is possible to apply indexing on the embedded documents too. This indexing requires the use of dot notation for the embedded documents. Continuing our “student” example,

{

“_id”: ObjectId(“681b13b5bc3446894d86cd342”),

“marks”: 500,

“address”: { state: “Virginia”, city: “Fairfax” }

}

We can apply indexing on the address.state field.

db.student.createIndex( { “address.state”: 1 } )

Whenever queries involving “address.state” are employed by the users, this index would support them. For instance,

db.student.find( { “address.state”: “FL” } )

db.student.find( { “address.city”: “Chicago”, “address.state”: “IL” } )

Likewise, it is possible to build indexes on the complete embedded document.

Suppose you have a collection “users” which contains the following data.

{

“_id”: ObjectId(“681d15b5be344699d86cd567”),

“gender”: “male”,

“education”: { high school: “ABC School”, college: “XYZ University” }

}

If you are familiar with MongoDB, then you know that “education” field is what we call an “embedded document”. This document contains two fields: high school and college. Now to apply indexing on the complete document, we can write the following.

db.users.createIndex( { education: 1 } )

This index can be used by queries like the following.

db.users.find( { education: { college: “XYZ University”, high_school: “ABC School” } } )

Compound Indexes

So far, we have only used a single field for indexing. However, MongoDB also supports the usage of multiple fields in an index. Such indexes are referred to as compound indexes. Bear in mind that there can be no more than 32 fields in compound indexes. To generate such an index, you have to follow this format where ‘f’ refers to the field name and ‘t’ refers to the index type.

db.collection.createIndex( { <f1>: <t1>, <f2>: <t2>, … } )

Suppose we have a collection “items” which stores these details.

{

“_id”: ObjectId(…),

“name”: “mouse”,

“category”: [“computer”, “hardware”],

“address”: “3rd Street Store”,

“quantity”: 80,

}

Compound index can be now applied on the “name” and “quantity” fields.

db.items.createIndex( { “name”: 1, “quantity”: 1 } )

Bear in mind that the order of fields in a compound index is crucial. The index will process by first referencing to the documents which are sorted according to the “name” field. Afterward, it will process the “quantity” field with the values of the sorted “name”.

Compound indexes are not only useful in supporting queries, which equal the index fields, but they also work with matched queries for the index field’s prefix. This means that the index works with queries that have only the “name” field as well as those that have the “quantity” field. For instance,

db.items.find( { name: “mouse” } )

db.items.find( { name: “mouse”, quantity: { $gt: 10 } } )

So far we have been using descending and ascending order with queries. Now, there is no issue in running it with single-field indexes but for the compound indexes, you have to analyze if your queries will work or not. For example, we have a collection “records” which stores documents having the fields “date” and “item”. When queries are used with this collection, then firstly, results are generated by arranging “item” in ascending order, and then a descending order is applied on the “date” values. For instance,

db.records.find().sort( { item: 1, date: -1 } )

Queries where we apply a descending order on the “item” and an ascending order on the “date” value work like:

db.records.find().sort( { item: -1, date: 1 } )

These sort operations can perfectly work with the queries like these:

db.records.createIndex( { “item” : 1, “date” : -1 } )

However, the point to note is that you cannot apply ascending order on both fields like the following.

db.records.find().sort( {“item”: 1, date: 1 } )


Design Patterns for Functional Programming


In software circles, a design pattern is a methodology and documented approach to a problem and its solution which is bound to be found repeatedly in several projects as a tumbling block. Software engineers customize these patterns according to their problem and form a solution for their respective applications. Patterns follow a formal structure to explain a problem and then go over a proposed answer as well as key points which are related to either the problem or the solution. A good pattern is one which is well known in the industry and used by the IT masses. For functional programming, there are several popular design patterns. Let’s go over some of these.

Monad

Monad is a design pattern which takes several functions and integrates them as a single function. It can be seen as a type of combinatory and is a core component of functional programming. In monad, a value is wrapped in a box which is then unwrapped and a function is passed to use the wrapped value.

To go into more technicalities, a monad can be classified into running on three basic principles.

·         A parameterized type M<T>

According to this rule, T can possess any type like String, Integer, hence it is optional.

·         A unit function T -> M<T>

According to this rule, there can be a function taking a type and its processing may return “Optional”. For instance, Optional.of(String) returns Optional<String>.

·         A bind operation: M<T> bind T -> M <U> = M<U>

According to this rule which is also known as showed operator due to the symbol >>==. For the monad, the bind operator is called. For instance, Optional<Integer>. Now this takes a lambda or function as an argument for instance like (Integer -> Optional<String> and returns and processes a Monad which has a different type.

Persistent Data Structures

In computer science, there is a concept known as a persistent data structure. Persistent data structure at their essence work like normal data structure but they preserve their older versions after modification. This means that these data structures are inherently immutable because apparently, the operations performed in such structures do not modify the structure in place. Persistent data structures are divided into three types:

  • When all the versions of a data structure can be accessed and only the latest version can be changed, then it is a partially persistent data structure.
  • When all the versions of a data structure can be accessed as well as changed, then it is a fully persistent data structure.
  • Sometimes due to a merge operation, a new version can be generated from two prior versions; such type of data structure is known as confluently persistent.

For data structure which does not show any persistence, the term “ephemeral” is used.

As you may have figured out by now, since persistent data structures enforce immutability, they are used heavily in functional programming. You can find persistent data structure implementations in all major functional programming language. For instance, in JavaScript Immutable.js is a library which is used for implementing persistent data structures. For example,

import { MapD } from ‘immutable’;

let employee = Map({

employeeName: ‘Brad’,

age: 27

});

employee.employeeName; // -> undefined

employee.get(’employeeName’); // -> ‘Brad’

Functors

In programming, containers are used to store data without assigning any method or properties to them. We just put a value inside a container which is then passed with the help of functional programming. A container only has to safely store the value and provide it to the developer in need. However, the values inside them cannot be modified. In functional programming, these containers provide a good advantage because they help with forming the foundation of functional construct and assist with asynchronous actions and pure functional error handling.

So why are we talking about containers? Because functors are a unique type of container. Functors are those containers which are coded with “map” function.

Among the simplest type of containers, we have arrays. Let’s see the following line in JavaScript.

const a1 = [10, 20,30, 40, 50];

Now to see a value of it, we can write.

Const x=y[1];

In functional, the array cannot be changed like.

a1.push(90)

However, new arrays can be created from an existing array. An array is theoretically a function. Technically, whenever a unary function is mapped with a container, then it is a functor. Here ‘mapped’ means that the container is used with a special function which is then applied to a unary function. For arrays, the map function is the special function. A map function processes the contents of an array and performs a special function for all the elements of the element step-by-step after which it responds with another array.

Zipper

A zipper is a design pattern which is used for the representation of an aggregate data structure. Such a pattern is good for codes where arbitrarily traversal is common and the contents can be modified, therefore it is usually used in purely functional programming environments. The concept of Zipper dates back to 1997 where Gérard Huet introduced a “gap buffer” strategy.

Zipper is a general concept and can be customized according to data structures like trees and lists. It is especially convenient for data structures which used recursion. When used with zipper, these data structure are known as “a list with zipper” or “a tree with zipper” for making it apparent that their implementation makes use of zipper pattern.

In simple terms, zipper with data structure has a hole. They are used for the manipulation and traversal in data structures where the hole indicates the present focus for the traversal. Zipper facilitates developers to easily move within the data structure.

Best Functional Programming Practices – When to Use Functional?


For any paradigm, the global developer community experiences several common issues in their development of projects. To counter the recurring issues, they begin exercising certain practices for getting the most out of a paradigm. For functional programming in Java too, there have been a number of practices which have been deemed as useful and valuable for programmers. Let’s go over some of them.

Default Methods

Functional interfaces remain “functional” even if default methods are added. Though, if more than one abstract method is added, then they are no longer a functional interface.


@FunctionalInterface

public interface Test {

String A();

default void defaultA() {}

}

As long as the abstract methods of functional interface retain identical signatures, they can be extended by other functional interfaces. For instance,


@FunctionalInterface

public interface TestExtended extends B, C {}

@FunctionalInterface

public interface B {

String A();

default void defaultA() {}

}


@FunctionalInterface

public interface C {

String A();

default void defaultB () {}

}


When usually interfaces are extended, they encounter certain issues. They are recurrent with functional interfaces too when they run with default methods. For instance, if the interfaces B and C have a default method known as defaultD()  then you may get the following error.

interface Test inherits unrelated defaults for defaultD() from types C and D…

To solve this error, the defaultD() method can be overridden with the Test interface.

It should be noted that from the software architecture perspective, the use of a lot of default methods in an interface is detrimental and discouraged. This is something which should be used for updating older interfaces while escaping any backward compatibility issue.

Method References

Many times, methods which were implemented before are called out by lambdas. Hence, for such cases, it is good to make use of method references, a new feature in Java 8.

For example, if we have the following lambda expression.

x -> x.toUpperCase();

Then it can be replaced by:

String::toUpperCase;

Now, this type of code does not only reduce line of codes but it is also quite readable.

Effectively Final

Whenever a variable is accessed which is not “final” and resides in lambda expression, then an error is likely to be caused. This is where “effectively final” comes into play. When a variable is only assigned once then the compiler thinks of it as a final variable. There is nothing wrong in using these types of variables in lambda expressions as their state is managed by the compiler and it can notify for an error as soon as their state is meddled with. For instance, the following code cannot work.

public void A(){

String lVar = “localvariable”;

Test test = parameter -> {

String lVar = parameter;

return lVar;

};

}

In return, the compiler may notify you that “lVar” does not need to be defined because it already has been in the scope.

No Mutation for Object Variables

Lambda expressions are predominantly used in parallelism or parallel computing because of their protection for threads. The paradigm “effectively final” can help at times but sometimes it is not good enough. An object’s value cannot be changed from the closing scope by lambdas. On the other hand, with mutable object variables, it is possible for a state in lambda expression to be modified. For instance check the following.

int[] n = new int[1];

Runnable rn = () -> n[0]++;

rn.run();

Now the above code is perfectly legal because the “n” variable stays “effectively final”. However, it has referenced an object and the state of that object can change. Hence, use this example to remember not writing code which may give rise to mutations.

When to Use Functional?

Before learning functional programming, you must be curious about its actual advantage over other paradigms. When you have a task at hand where you are dabbling with parallelism and concurrency, in such cases functional programming can be a good choice. In real life scenarios, for this purpose Erlang was used a lot in Erricson for its telecommunication work. Likewise, Whatsapp has always been involved in a similar use. Other success stories include the reputable Lucent.

For any individual who has dialed a number in the past three decades in US, there are strong possibilities of their use of devices which have code in a language known as Pdiff. Pdiff itself was created from a functional programming language, Standard ML.

Pdiff’s example can be used to recall functional programming’s brilliance with DSLs (domain specific languages). Sometimes, common programming languages like C++, C#, and Java struggle to create a solution for certain issues where DSLs were the life-savers. While DSLs are not used to design entire systems but they can prove invaluable to code one or two modules. Industry experts consider functional programming as an excellent option to write DSL.

Moreover, functional programming is quite good at solving algorithms, particularly those filled with mathematics. Mathematical problems can be solved well in functional, perhaps due to its closeness in theoretical foundations with mathematics.

When to Not Use Functional?

So when to not use functional programming? It is said that functional programming does not work well with the general “library glue code”. It is a disaster for recipe with the general building of structure classes which are used in mainstream development. This means that in case your code-base is filled with classes working like structures, and if the properties of your object are changing continuously, then functional is probably not the best idea.

Likewise, functional is also not good for GUIs (graphical user interface). The reason is that GUIs have always been deemed more suitable for OOP because of the reusability factor. In GUI applications, modules are derived with little changes from other modules. There is also the “state” factor as GUIs are stateful (at least in the view).


Dos and Don’ts of Functional Programming


While working with functional programming in Java, there are several do’s and don’ts. Let’s go over the most common ones. By making use of these tips, you can improve your functional programming code-base with good results.

Standard Functional Interfaces

The Functional interfaces in “java.util.function” are good enough to fulfill requirements for method references and lambda’s target types. As explained earlier, these interfaces are abstract, thereby making it easier to customize them freely into a lambda expression. Hence, before writing new functional interfaces, makes sure to check this package which may satisfy your requirements.

Suppose you have in interface FuncInt

@FunctionalInterface

public interface FuncInt {

String f1(String txt);

}

Now you have a class for using the interface with the name useFuncInt which has a method for sum.

public String sum(String txt, FuncInt) {

return FuncInt f1(txt);

}

For execution of it, you would have to add the following:

FuncInt fi = txt -> txt + ” coming from lambda”;

String output = useFuncInt.add(“Message “, useFuncInt);

Now, if you observe closely, you will realize that FuncInt is a function which takes one argument and returns with an answer. With the release of Java 8, this functionality is enabled through the interface in “Function<T,R> which is entailed in the package of “java.util.function”. Our FuncInt can be fully eliminated and our code can be modified to.

public String sum(String txt, Function<String, String> f) {

return f.apply(txt);

}

For execution, write the following:

Function<String, String> f =

parameter -> parameter + ” coming from lambda”;

String output = useFuncInt.sum(“Message “, f);

Annotation Matters

Make the use of annotation by adding functional interfaces with the help of @FunctionalInterface. If you are unfamiliar with annotations, then put it with a tag which is used to represent the metadata; this could be related to an interface, method, field, or class about any useful information that can prove to be helpful for the JVM (Java Virtual Machine) or the complier.

The @FunctionalInterface may not seem logical at the first glance because without adding it, the interface would work fine as a functional one as long it contains only one abstract method.

However, in large-scale projects where the increasing number of interfaces may overwhelm you, manual control is tricky and exhaustive; it becomes a nightmare to keep track of it. Sometimes, an interface which was created as a functional interface may get additional abstract methods, therefore ceasing to exist as a functional interface. This is where the @FunctionalInterface annotation works like a charm. By using it the complier would display an error whenever there is any intrusion by a programmer to change the structure of a functional interface and disrupt its “purity”. Likewise, while working in teams, it can be helpful for other coders to understand your code and identify functional interfaces easily.

Hence, always use something like this,

@FunctionalInterface

public interface FuncInt{

String printSomething();

}

Instead of writing something like this:

public interface FuncInt{

String printSomething();

}

Even if you are working on beginner projects, make it a habit to always add the annotation or you may face the repercussions in future.

Lambda Expressions Cannot Be Used Like Inner Classes

When an inner class is used, “scope” is generated. This means that we can add variables which are local with the enclosing scope after instantiating local variables having identical names. The keyword “this” can also be used in our class for referencing to its own instance.

With lambda expressions, we work by using enclosing scope. This means that variables cannot be overwritten in the body of the lambda expression from the enclosing scope. We can use “this” for referencing.

For instance, for our class UseTest, we have “test” as our instance variable:

private String txt = “Encircling the scope”

Now, you can use another method of our class with the following code and run it like this:

public String example()

{

Test test = new Test();

String mssg = “inner value of the class”

@Override

Public String returnSomething(String txt)

Return this.mssg;

}

};

String output = test.returnSomething(“”);

Test testLambda = parameter -> {

String mssg = “Lambda Message”;

return this.mssg;

};

String outputLambda= testLambda.returnSomething(“”);

return “Output: output = “ + output + “outputLambda = “ + outputLambda;

When you will run the “example” method, you may get the following: “Output: output =  inner value of the class, outputLambda = Encircling the scope

This means that you can access and use a local variable by accessing its instance. By using “this”, you might have used the variable “test” of the UseTest class but you were unable to get the “test” value which in entailed in the body of the lambda.

Lines of Code in Lambdas

Ideally, lambda expressions should comprise of a single line of code because this makes it a self-explanatory concrete implementation where the clear execution of an action at some data is represented.

If you require more lines for your functionality, then write something like this:

Test test = parameter -> generateText(txt);

private String generateText(String txt) {

String output = “Some Text” + txt;

// several lines of code

return output;

}

Refrain from writing something like this:

Test test = txt -> { String output= “Some Text” + txt;

// several lines of code

return output;

};

Though, it is important to note that sometimes, it is ok to have more than one line of lambda expressions where the use of another method may prove to be counter-productive.

Type of Parameters

The compilers are powerful enough to ascertain the types of parameters in lambda expressions with type inference. Hence, there is no need for adding the parameter type explicitly.

Don’t write something like this.

(String x, String y) -> x.toUpperCase() + y.toUpperCase();

Instead, write something like this,

(x, y) -> x.toUpperCase() + y.toUpperCase();

Java Lambdas


So far we have talked a lot about functional programming. We discussed the basics and even experimented with some coding of functional interfaces. Now is the right time to touch one of the most popular features of Java for functional paradigm, known as lambda expressions or simply lambdas.

What Is a Lambda Expression?

A lambda expression provides functionality for one or more functional interface’s instances with “concrete implementations”. Lambdas do not require the use of a class for their use. Importantly, these expressions can be viewed and worked by coding them as objects. This means that, like objects, it is possible to pass or run a lambda expression. The basic style for writing a lambda expression requires the use of an “arrow”. See below:

parameter à the expression body

On the left side, we have a “parameter”. We can write single or multiple parameters for our program. Likewise, it is not mandatory to specify the parameter type because compilers already ascertain the parameter type. If you are using a single parameter, then you may or may not add a round bracket.

However, if you intend to add multiple parameters, then make sure to use round brackets (). Sometimes, there is no need of parameters in a lambda expression. For such cases, it is possible to signify them by simple adding an unfilled round bracket. To avoid error, use round brackets for parameter whether you are using a 0, 1, or more parameters.

On the right side of the lambda expression, we can have an expression. This expression is entailed in curly brackets. Like parameters, you do not require brackets for a single expression while multiple expressions require one. However, unlike parameter, the return type of a function can be signified by the body expression.

Without Lambdas

To understand lambdas, check this simple example.

package fp;

public class withoutLambdas {

public static void main(String[] args) {

withoutLambdas wl = new withoutLambdas(); // generating instance for our object

String lText2 = “Working without lambda expressions”; // here we assign a string for the object’s method as a parameter

wl.printing(lText2);

}

public void printing(String lText) { // initializing a string

System.out.println(lText);              // creating a method to print the String

}

}


The output of the program is “Working without lambda expressions”. Now if you are familiar with OOP, then you can understand how the caller was unaware of the method’s implementation i.e. it was hidden from it. What is happening here is that the caller gets a variable which is then used by the “printing” method. This means we are dealing with a side effect here—a concept we explained in our previous posts.

Now let’s see another program in which we go one step ahead, from a variable to a behavior.

package fp;

public class withoutLambdas2 {

interface printingInfo {

void letsPrint(String someText);  //a functional interface

}

public void printingInfo2(String lText, printingInfo pi) {

pi.letsPrint(lText);


}


public static void main(String[] args) {

withoutLambdas2 wl2 = new withoutLambdas2(); // initializing instance

String lText = “So this is what a lambda expression is”; // Setting a value for the variable

printingInfo pi = new printingInfo() {

@Override // annotation for overriding and introducing new behavior for our interface method

public void letsPrint(String someText) {

System.out.println(someText);

}

};

wl2.printingInfo2 (lText, pi);

}


}

In this example the actual work to print the text was completed by the interface. We basically formulated and designed the code for our interface’s implementation. Now let’s use Lambdas to see how they provide an advantage.


package fp;

public class firstLambda {


interface printingInfo {

void letsPrint(String someText);    //a functional interface

}

public void printingInfo2(String lText, printingInfo pi) {

pi.letsPrint(lText);

}


public static void main(String[] args) {

firstLambda fl = new firstLambda();

String lText = “This is what Lambda expressions are”;

printingInfo pi = (String letsPrint)->{System.out.println(letsPrint);};

fl.printingInfo2(lText, pi);

}

See how we improved the code by integrating a line of lambda expression. As a result, we are able to remove the side effect too. What the expression did was use the parameter and processed it to generate a response. The expression after the arrow is what we call as a “concrete implementation”.

Introduction to Apache Kafka


Apache Kafka is a fault-tolerant and scalable messaging system that works on the publish-subscribe model. It helps developers to design distributed systems. Many major web applications like Airbnb, Twitter and Linkedin use Kafka.

Need for Kafka

Going forward, in order to design innovative digital services, developers require access to a wide data stream—which has to be integrated as well. Usually, the data sources such as transactional data like shopping carts, inventory, and orders are integrated with searches, recommendations, likes, and patch links. This portion of data holds an important role to offer insights into the behavior of customers’ purchasing habits. Here, different prediction analytics systems are used to predict future trends. It is this domain in which Kafka’s brilliance offers the companies a chance to edge their competitors.

How Was It Conceptualized

Around 9 years ago, in 2019, a team comprising of Neha Narkhede, Jun Rao, and Jay Kreps developed Apache Kafka at Linkedin. At that time, they were focusing to resolve a complex issue—voluminous amounts of event data related to LinkedIn’s infrastructure and website struggled from low latency ingestion. They planned to use a lambda architecture that took advantage of real-time event processing systems like Hadoop. Back then, they had no access to any real-time applications that could solve their issues.

For data ingestion, there were solutions in the form of offline batch systems. However, doing so risked exposing a lot of implementation information. These solutions also utilized a push model, capable of overwhelming consumers.

While the team had the option to use conventional messaging queues like RabbitMQ, they were deemed as overkill for the problem at hand. Companies do wish to add machine-learning but when they cannot get the data, the algorithms are of no use. Data extraction from the source systems was difficult, particularly moving it reliably. The existing enterprise messaging and batch-based solutions did not resolve the issue.

Hence, Kafka was designed as the ingestion backbone for such issues. By 2011, Kafka’s data ingestion was close to 1 billion events per day. In less than 5 years, it reached 1 trillion messages per day.

How Does Kafka Work?

Kafka offers scalable, persistent, and in-order messaging. Like other publish-subscribe systems, it is also powered by topics, subscribers, and publishers. It supports high parallel consumption via topic partitioning. Each message that is written to Kafka replicates and persists to the peer brokers. You can adjust the time span of these messages, for instance, if you configure it 30 days then they perish after a month.

Kafka’s major aspect is its log. Log here refers to the data structure that is append-only data order insertion which is time-ordered. In Kafka, you can use any type of data.

Typically, a database writes event modifications to a log and also extracts column values from them. For Kafka, messages write to a topic that is responsible for log maintenance. From these topics, subscribers can access and extract their relevant data representations.

For instance, a shopping cart’s log activity might include: add product shirt, add product bag, remove product shirt, and checkout. For the log, this activity is presented to the downstream systems. When that log is read by a shopping cart service, it can reference to the objects of the shopping cart that indicate the constituents of the shopping cart: product bag, and ready for checkout.

Since Apache Kafka is known to store messages for longer period of time, applications can be re-winded to previous log positions for reprocessing. For instance, consider a scenario in which you wish to use a new analytic algorithm or application so it can be tested for the previous events.

What Apache Kafka Does Not Do?

Apache Kafka offers blazing speed as it displays the log data structure like a first-class resident. It is far different from other conventional message brokers.

It is important to note that Kafka does not support individual IDs for messages. These messages are referenced according to their log offsets. It also refrains from monitoring consumers in terms of topic or their message consumption—consumers themselves can do all this.

Due to its unique design from other conventional messaging brokers, it can offer the following optimizations.

  • It offers a decrease in the load. This is done by its refusal to maintain indexes that have the message records. Moreover, it does not offer random access; consumers define offsets where beginning from the offset, messages are delivered by Kafka in the correct order.
  • There are no delete options. Kafka maintains log parts for a specific time period.
  • It can use kernel-level input/output for effective stream messages to consumers, without depending on message buffering.
  • It can take advantage of the OS for the write operations to disk along with file page caches.

Kafka and Microservices

Due to Kafka’s robust performance for big data ingestion, it has a series of use cases for microservices. Microservices often depend on event sourcing, CQRS, and other domain-driven concepts for scalability; their backing store can be provided by Kafka.

Often, event sourcing applications create a large amount of events—their implementation with conventional databases is tricky. By using Kafka’s feature log compaction, you can preserve your events for as long as possible. In log compaction, the log is not discarded after a defined time period; instead, Kafka saves all the events with a key set. As a result, the application gains loose coupling since it can discard or lose logs; at any point time, it uses the preserved events for the restoration of the domain state.

 When to Use Kafka?

Apache Kafka’s use depends on your use case. While it solves many modern-day issues for web enterprises, similar to the conventional message brokers, it cannot perform well in all scenarios. If your intention is to design a reliable group of data applications and services, then Apache Kafka can function as your source of truth, gathering and storing all the system events.


Introduction to Rest with Examples – Part 2


In the previous post, we talked about what is REST APIs and discussed a few examples, we particularly, used CURL for our requests. So far, we have established that a request is composed of four parts: endpoint, method, header, and data. We have already explained endpoint and method, now let’s go over the header, data, and some more relevant information on the subject.

Headers

Headers offer information to the server and the client. They are used for a wide range of use cases, such as offering a peek into the body content or for authentication. Typically, HTTP headers follow the property-value pair format; a colon separates them. For instance, the following example consists of a header which informs the server about expecting JSON-based content.

“Content-Type: application/json”. Missing the opening”

By using cURL (we talked about it in the last post), you can use the –header option for sending the HTTP headers. For instance, if you want to send the above-mentioned header, then for the Github API, you can write the following.

curl -H “Content-Type: application/json” https://api.github.com

In order to check all of your sent headers, you can use the –verbose or the –v option at the end of the request. Consider the following command as an example.

Keep in mind that in your result, “*” indicates cURL’s additional information, “<” indicates the response headers and “>” indicates the request headers.

The Data (Body)

Let’s come to the final component of a request, also known as the message or the body. It entails information that is to be sent to any server. To use cURL for sending data, you can use the –data or the –d options like the following format.

For multiple fields, you can write the following .i.e. add two –d options.

It is also possible to break requests into several lines for better readability. When you learn how to spin (start) servers, you can easily create your API and test it with any data. If you are not interested in spinning up a server, you can use Requestbin.com and hit the “create endpoint”. In response, you can get a request which can be used for testing requests. In order to test requests, you have to generate your own request bin. Keep in mind that these request bins have a lifespan of 48 hours. Now you can transfer data to your request bin by using the following.

curl -X POST https://requestb.in/1ix963n1 \

-d name=adam \

-d age=28

cURL’s data transfer is similar to a web page’s form fields. For JSON data, you can alter your “Content-Type” and change it to “application/json”, like this.

curl -X POST https://requestb.in/1ix963n1 \

-H “Content-Type: application/json” \

-d ‘{

“adam”:”value”

“age”:”28”

}’

And with this, your request’s anatomy is finished.

Authentication

While using POST requests with your Github API, a message displays “Requires authentication”. What does this mean exactly?

Developers ensure that there are certain authorization measures so specific actions are only performed by the right parties; this negates the possibilities of impersonation by any malicious third party. PUT, PATCH, DELETE, and POST requests change the database, forcing the developers to design some sort of authentication mechanism. What about the GET request? It also needs authentication but only in some cases.

In the world of web, authentication is performed in two ways. Firstly, there is the generic user/password authentication—known as the basic authentication. Secondly, authentication is done by a secret token. The second method consists of something known as oAuth—it uses Google, Facebook, and other social media platforms for user authentication. For using the user/password authentication, you have to use the “-u” option like the following.

You can test this authentication yourself. Afterward, the previous “requires authentication” response is changed to “Problems parsing JSON”. The reason behind this is that so far, you have not sent any data. Since it is a POST request, data transfer is a must.

HTTP Error Messages and Status Codes

The above-mentioned messages like “Problems parsing JSON” or “Requires authentication” fall into the category of HTTP error messages. These emerge whenever a request has an issue. With HTTP status codes, you can learn your response status instantly. The range of these codes starts from 100+ and end to 500+.

  • The success of your request is signified by 200+.
  • The redirection of the request to any URL is signified by the 300+.
  • If the client causes an error, then the code is 400+.
  • If the server causes an error, then the code is 500+.

In order to debug a response’s status, you can use the head or verbose options. For instance, if you add “-I” in a POST request and do not mention the username/password details, then it can cause a 401 status code. When your request is flawed—either due to incorrect or missing data, a 400 status code appears.

Versions of APIs

Time and again, developers upgrade their APIs, it is a life-long process. When too many modifications are required, the developers should consider creating a new version. When this occurs, it is possible that your application gets an error; due to the fact that you wrote code with respect to the previous version API while the brand-new API is pointed out by your requests.

In order to perform a request for a certain version of the API, there are two methods. Depending on your API’s structure, you can choose any of them.

  • Use endpoint.
  • Use the request header.

For instance, Twitter follows the first strategy. For instance, a website can follow it in this way:

https://api.abc.com/1.1/account/settings.json

On the other hand, Github takes advantage of the second method. For instance, consider the following where the API version is 4 as mentioned in the request header.

curl https://api.abc.com -H Accept:application/abc.v4+json


An Introduction to REST with Examples – Part 1


REST stands for Representational State Transfer. If you have just transitioned from a desktop application development environment to the world of web development, then you have probably heard about REST APIs.

To understand REST API, let’s take an example. Suppose you search “Avengers: Endgame” in the search bar of YouTube. As a result, you can check a seemingly endless list of videos on the result pages; this is exactly how a REST API is supposed to work—providing you results for anything that you want to find.

Broadly speaking, an API is just a number of fixed functionalities that help programs in communicating with each other. The API is created by the developer on the server—to which the client communicates. REST is a software architectural style that determines the working of the API. Developers use it to design their APIs. Among REST rules, one is to ensure that the user gets any specific data—also referred to as a resource—if a specific URL is linked. In this context, URL is known as a request and the data that is received by the user is known as a response.

What Makes Up a Request?

Usually, there are four components make up a request.

  1. The endpoint
  2. The method
  3. The headers
  4. The data

The Endpoint

The URL that is requested by a user is known as an endpoint. It comprises of the following structure.

root-endpoint/?

Here, the “root-endpoint” signifies an API’s starting point from which a user requests data. For instance, Twitter’s root-endpoint API is https://apitwitter.com.

The path indicates the requested resource. Just think of it as a simple automated menu: you get what you click on. Paths can be accessed the same way as a website’s sections. For instance, if there is a website https://techtalkwithbhatt.com on which you want to check all the tagged posts on Java, then you can go to https://techtalkwithbhatt.com/tag/java. Here, as you can guess, https://techtalkwithbhatt.com is the root-endpoint while the path is the /tag/java.

In order to check the available paths, you must go through the documentation of that specific API. For instance, suppose you have to check repositories of a user via the Github’s API; you can simply go to this link and learn the path.

/users/:username/repos

In place of the colons in the above path, you have to alter and add any username of your choice. For instance, if there is a user named sarveshbhatt, then you should write the following:

https://api.github.com/users/sarveshbhatt/repos

Lastly, we also have the query parameters in the endpoint. Strictly speaking, they do not come under the REST architecture but they are extensively used in the APIs. Query parameters offer the functionality to change your request by adding key-value pairs. These pairs start off with a question mark and all parameter pairs are separated by adding a “&” character. The format is listed below.

?queryone=valueone&querytwo=valuetwo

Using Curl

These requests can be sent with different languages. For example, Python developers use Python Requests; JavaScript developers use the jQuery’s Ajax method and the Fetch API.

However, for this post, we are going to use a user-friendly utility that is already installed in your computer, cURL. Since API documentation typically resembles cURL, therefore if you can get the hang of it then you can understand any API documentation—allowing you to create requests easily.

But first, let’s check whether or not cURL is installed on your PC. Depending on your OS, open the Terminal and enter the following.

curl –version.

In response, you can get a result which looks similar to the following screen.


Those who do not have CURL can see a “command not found” error. To install curl, you can check this link. In order to work with cURL, you can enter “curl” with any endpoint. For instance, to check the Github root endpoint, you can use the following line.

curl https://api.github.com

The resulting response can seem like the following.

Similarly, you can check the repositories of a user by adding a path to the endpoint—we discussed how to do this above. Just add “curl” and write the following command.

curl https://api.github.com/users/Sarveshbhatt/repos

However, keep in mind that while using query parameters in the command line, you have to add a backslash (“\”) prior to the question mark (“q”) and “=” characters. The reason behind this is that both the “=” and “?” are recognized by the command line as the special characters. Therefore you have to add “\” so they are interpreted by the command line as a part of the command.

JSON

JSON stands for JavaScript Object Notation; a popular format used to send and request data with a REST API. If you send a request to Github, then it can send you back a response that bears the JSON format. As the name suggests, a JSON object is essentially an object in JavaScript. JSON’s property-value pairs are encompassed with a double quotation mark.

The Method

Going back to the request, now let’s come to the second component: the method. The method is simply a request type which is sent to the server. The method types are: GET, POST, PUT, PATCH and DELETE.

The function of these methods is to give meaning to the request. CRUD (Create, Read, Update, and Delete) operations are performed by these methods.

  • GET


The GET request is used when a server resource is needed. When it is used, the server searches for your requested data and sends it to you. It is the default request method.

  • POST

The POST request generates a new resource on the server. When you use this request, the server generates a new record in the DB and responds to you about its success.

  • PUT and PATCH

These requests provide an update on a server’s resource. When these requests are used, a database entry is updated by the server and you get a message about its success.

  • DELETE

The DELETE request effectively eliminates a server resource. When you use this request, it performs a deletion in the database entry and informs you about its success.